How to Prepare and Post a Video to the Site
Updated: November 25 2025
The following are instructions on how to prepare and post videos for the site. The main emphasis is on the meeting and shop tour videos. Permissions needed: Editor on Web site, Zoom SAWS site access, Editor for YouTube SAWS channel.
There are many video editing tools. These instructions do not cover the details of editing the video. The output is a processed mp4 file with the intro and outro slides.
High level steps:
You should have the Google Drive for Meeting Videos bookmarked. If you don’t have this, contact the person who records the Zoom meetings.
Create a new folder for the monthly meeting video files and download the Zoom meeting recording from the Google Drive.
In PowerPoint, create some intro and outro slides or reuse as needed. Create a PNG file and store in the Laptop Meeting Video folder.
In the video editing tool, edit the video and export the video as MP4 to laptop folder. Take a screenshot for the thumbnail.
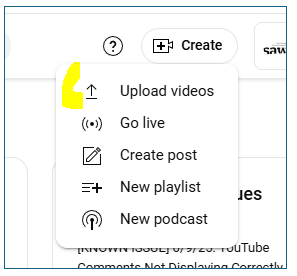
Go to YouTube studio and upload the video. Add the settings. Copy the YouTube link.
In Squarespace > Videos, create a video entry (either new or duplicate) which will appear in the Not Linked (pages) section. This entry is where we put the YouTube link (replace the video link on the duplicated entry). Also, this entry connects the news blog entry and post-meeting Event link to the YouTube video.
News blog post & meeting Event entry <- Video entry -> YouTube video.In video entry, update the video information and add the YouTube link. SAVE and move the entry down from Not Linked area to Videos folder.
Blog post entry – create a new one or duplicate a similar one. Update the settings and check the link to the video. The blog post is then reviewed. Once approved, schedule it for publishing on the web site and email to the members via MailChimp.
In the Event entry, change the Zoom link button to a Meeting Video link button.
Get Video from Zoom
The Zoom video file is automatically save to the Google drive when it becomes available. You should have a link to it. .
Prepare the destination folder - Meeting videos - Month.
Prepare the destination folder on laptop for the video.
Go to the Shared Google drive folder and download the video..
The download contains 3 files but we only need the file with the suffix .mp4
E.g., GMT20250524-145052_Recording.mp4Info about the files:
> suffix .crdownload - This is Chrome’s temporary file extension while a file is downloading. If the download gets interrupted or isn’t finished, it stays as .crdownload.
> suffix .m4a file: Zoom audio-only recordings are usually saved as .m4a once fully downloaded or processed. We typically do not use the audio file.
>suffix .mp4 this is the video and audio file to post
Zoom often creates multiple files per recording:
.mp4 (video with audio, large). This is the completely downloaded file.
.m4a (audio-only, smaller but can still be hundreds of MB for long meetings), Should play fine in VLC, QuickTime or any audio player.
sometimes other metadata or chat files.
Check the filename suffix. If it is not .mp4 file, then have to resume the download or start a new download.

Video Editing
The following instructions are general due to the variety of video editing tools and the Apple/Windows worlds.
TIP: To whip through the video to find the beginning and ending points (and view parts of it if necessary), it might be faster to view the video in Zoom and mark the timestamps.
Upload the .mp4 video file from the laptop into the tool.
Create and add the intro and outro slides to the video timeline.
Remove unnecessary footage such as setting up the chairs and checking audio.
The minimum slides for a meeting are:
Intro slides are the SAWS logo and a meeting title/speaker name.
The outro slide is the SAWS logo again. Add more slides as needed.
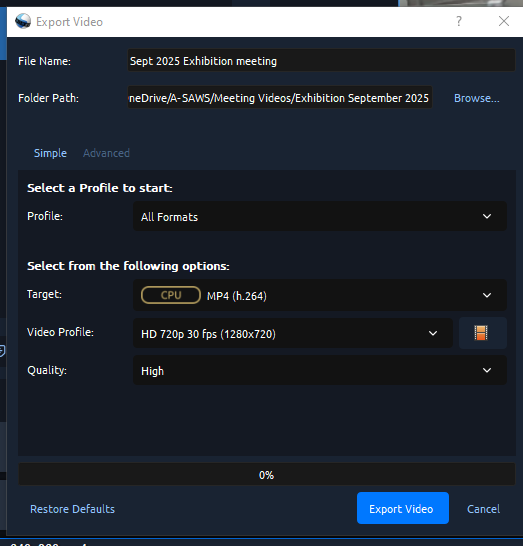
Export the video to allow the tool to process the video. The output will be an .mp4 file. There are various settings depending on where you will use the file. Generally the default should be fine for YouTube.
The processing can take several hours at least. Keep checking til it’s done then click DONE. It should be located in the same folder as the raw file’s location.
This is the file that will be uploaded to YouTube.
YouTube Upload
High level steps:
Log into the SAWS YouTube channel at studio.youtube.com. You must have permissions to be an editor on the SAWS channel. To access, select your Google logo. Then select, Switch Account, then SAWS.
Upload the video (this can take an hour or so. Varies with length, internet connection). Once uploaded, the video is automatically checked by YouTube for errors/problems.
Add a title and description (optional). The Newsletter is a good resource.
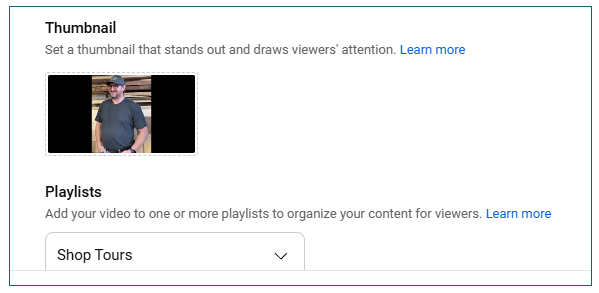
Add a thumbnail picture from a video screenshot or YouTube will auto-generate some options.
Select Playlist.
Confirm Child setting (default is video does not show children).
Click on Show More - review other settings..
Copy the YouTube link.

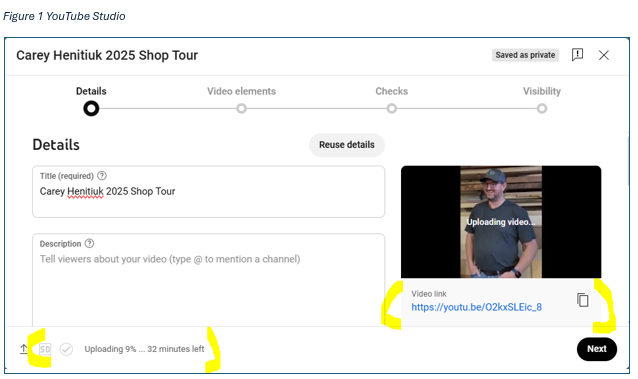
The YouTube link immediately appears when uploading starts. Note the copy icon to the right. If there are problems, you may need to upload again which will generate a different YouTube link.
While loading, you can do the settings. Scroll down on the main screen to see them.
Add Thumbnail picture. I added a screenshot picture from the video. You can try the auto-generate by YouTube as well.
Then scroll down and set the Playlist from the dropdown menu.
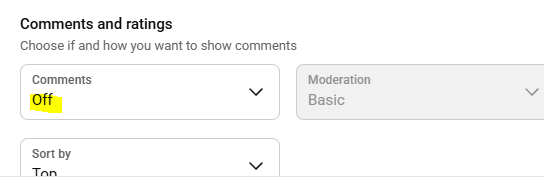
Next, further down, check the Kid setting. The video is automatically set as No Kids.
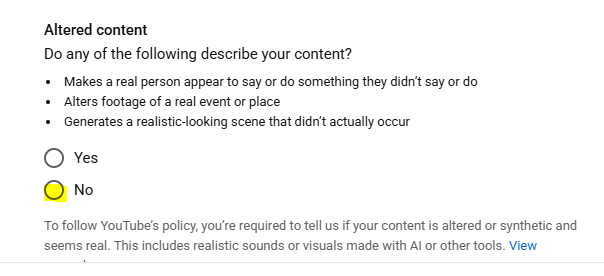
Click on SHOW MORE and adjust some of the settings - Altered Content, Captions Off.

UPLOADING and POST LOADING
The YouTube upload can take awhile. ****You can go ahead in Squarespace and prepare the video file entry and the blog entry while waiting for the YouTube video to load. However, the video must be fully loaded to YouTube before the link can be entered into the Not Linked video entry.****
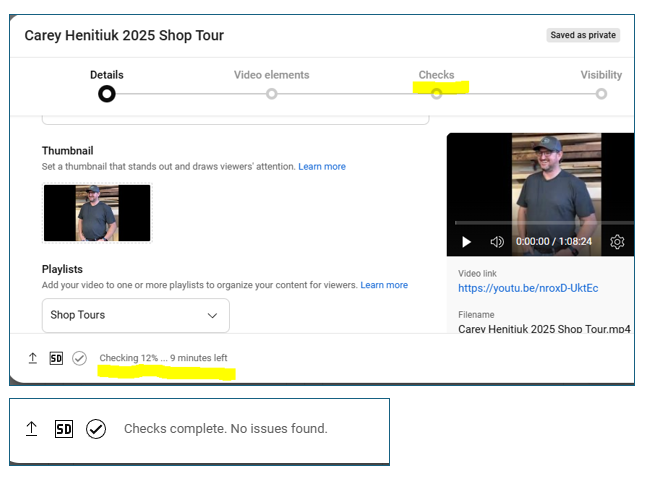
After uploading is complete, a message about processing appears. Wait til it is done. Then YouTube does some technical checks.
You should get the message “Checks complete. No issues found.” If there are problems, you will need to upload the video again.
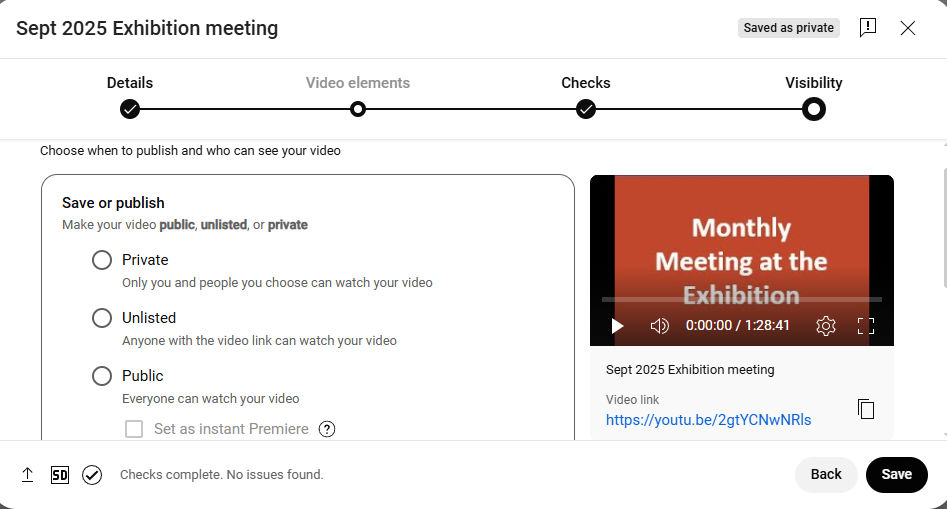
Set the visibility settings (see below). Set as UNLISTED.
Always run the video after uploading here and when connecting the link in Squarespace to make sure it works.
SAVE the video when everything looks good. Copy the Youtube URL. for insertion into the Squarespace Meeting Video entry. This connects the YouTube video with Meeting video entry which connects to the Blog entry.
Status: The video has been downloaded from Zoom, edited on a video tool and uploaded to YouTube.
Next Steps:
Create a video file entry. Basically, this is where we create a bucket for the video details and add the YouTube link. If you want to connect to this video anywhere in Squarespace, e.g., in a blog entry or event entry, you need the URL link set up here. It’s faster to duplicate a similar entry then edit it.
Create a news blog entry. This blog entry describes the meeting and includes the video file entry link. It’s faster to duplicate a similar entry then edit it than to create one from scratch. This entry will be reviewed then published. This means that it is sent out to the members and updated on the web site..
In the meeting event, change the Zoom link button to a Meeting video link button. Members can access the video from the Event or the News blog.
Be sure to check all the links - News blog and Event - to make sure the right YouTube video plays and it’s all working. Do this before scheduling a Review or Publish schedule date/time.
If it’s all working, you are done! Like everything else, it goes faster once you have done it a few times. Instructions for creating the video entry and blog entry follow.
Create Video File Entry
HIgh LeveI Steps:
We will create the video file entry for the YouTube. This entry will provide the link for connect the video with the YouTube video. We use the URL to connect to the News blog entry and Event.
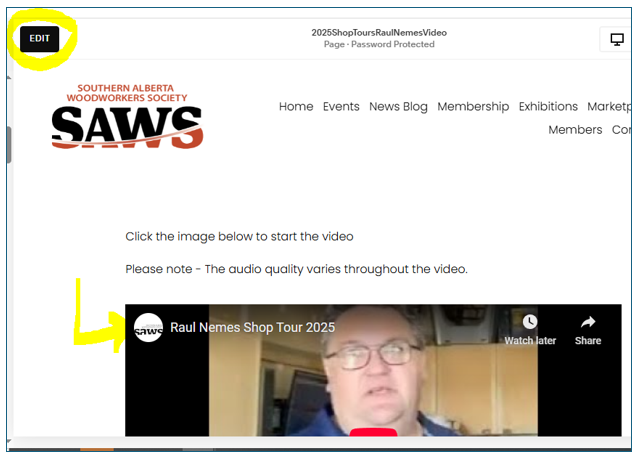
Go into website > Pages and scroll down to the Videos section.
Using Settings, duplicate a similar video there and it will be saved into the Not Linked (video) section. Duplicating an entry brings over the password and other settings. Will have to edit it for the new entry.
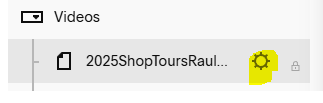
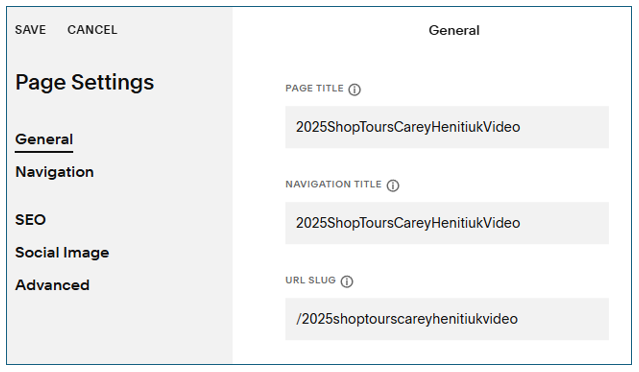
In Videos, we will duplicate an existing entry. In this example, we duplicated Raul’s Shop Tour video entry and changed it to Carey’s Shop video entry.
Highlight the video you want to copy and click on the Settings gear icon to display the Settings menu.
In Settings, scroll down and click on “Duplicate page”.
Message “Are you sure you want to create a copy of this page?”
Click on CONFIRM.
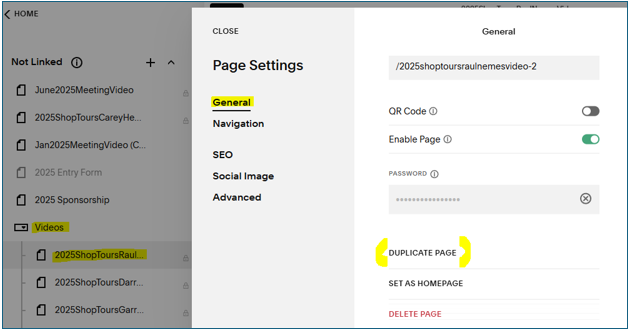
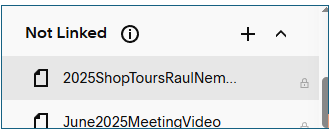
The duplicate entry will appear under the menu above Videos in the Not Linked section. The full file name has (Copy) at the end. The view in the tool limits the default horizontal display so you can’t see the full name.
Now we will update the duplicate file settings.
1. Highlight the duplicate file and click on the Settings gear icon.
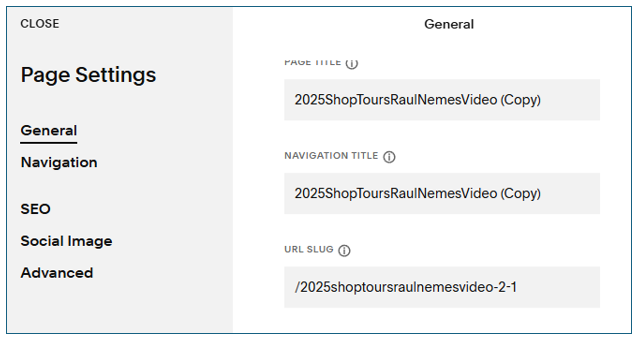

2. In Settings, edit the entries – Page Title, Navigation Title and URL Slug only. See next image.
If you scroll down on the General fields, note that the password field is already filled in. These videos can only be viewed from the Members page.
Ignore the other menu items.
3. SAVE your changes and CLOSE the window.
The next step is to link to the correct YouTube video.
Replace YouTube video link in duplicated file
The duplicated file still has the old link. We must connect to the correct one. NOTE: If you are multi-tasking, the video must be fully uploaded to YouTube.
Open the duplicate file entry again.
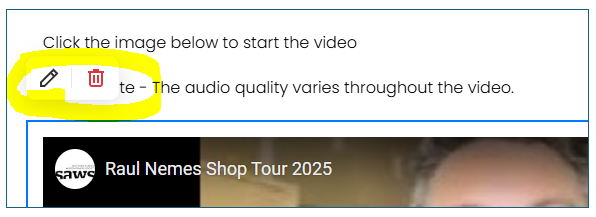
Edit the page – at the top left of the page, click on EDIT.
>> If you forget to click on EDIT first, the video will play when you click on it.<<Click on the video.
A small menu displays at the top left of the video.Click on the pencil icon.
A menu to the RIGHT of the video displays where we will replace the YouTube video link.
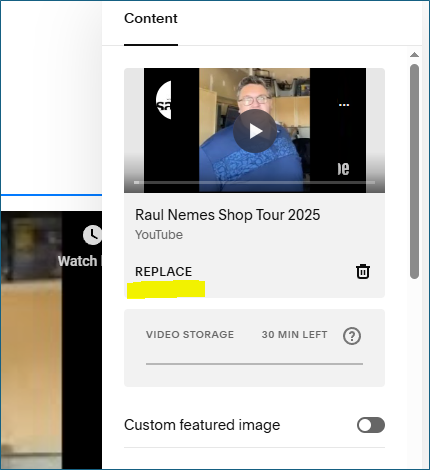
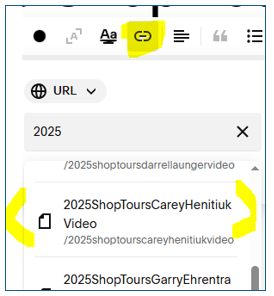
4. Click on REPLACE.
A dropdown menu displays.
5. Click on Add From Link.
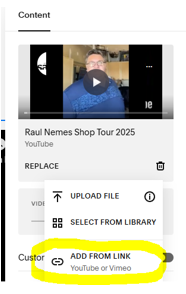
A window displays add the correct YouTube link.
6. Copy and paste the correct YouTube link then click on ADD. Then click somewhere on the screen to update it. There is no SAVE button.
7. Check the thumbnail to make sure it’s the right one.
8. Now SAVE the change and EXIT (top left).
The last step for creating the video entry is to move the file from Not Linked section to the Videos Section.
9. Mouse over the file and slowly move it down to the Video section and HOVER until there is a space made in the list by the program. Then release the mouse button. The file will now appear in the Video list.
Status: We have an updated video file entry with the correct YouTube link. Now we will create or duplicate a News Blog entry and connect it to THIS video file entry. Also update the Event entry.
In this example, we have already created the News Blog entry and will just update it.
For instructions on creating a News blog entry, see the Admin Pages entry News Blog guide.
Link the News Blog Entry to the video file entry
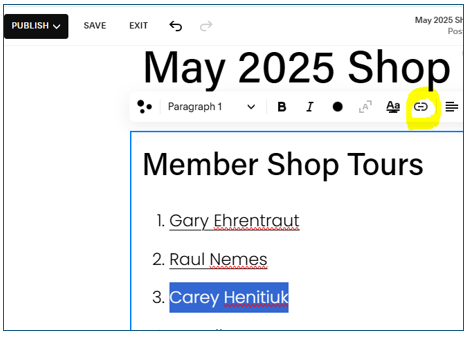
In the News Blog menu, open the blog entry page and click on EDIT.
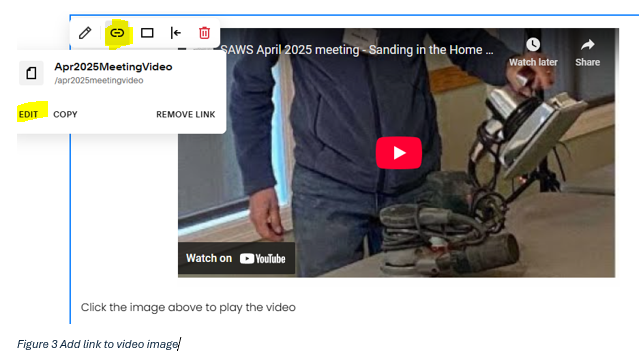
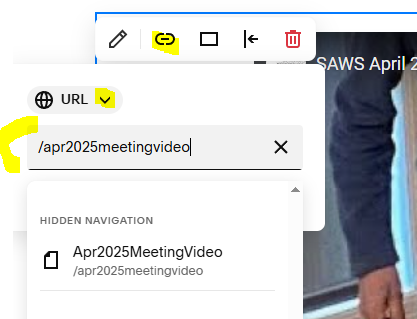
To add link to the image, click on the LINK icon and then EDIT. (next image Apr2025 example)
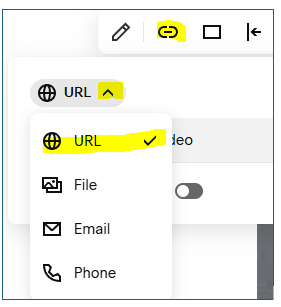
To add link to the text, highlight the text, click on the LINK icon. (following images)The link menu displays.
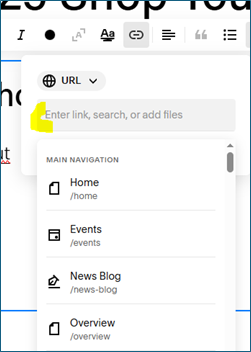
Click on URL down arrow and select URL to find the link to the video entry.
Start typing in the URL field and select the file from the list.
Click elsewhere on the page to apply the selection.
SAVE the change. Check the link. Then Exit.
Now the blog text has the link to the Video file entry in Squarespace. That video entry has the YouTube link.
7. Click on the blog post link to verify it is correct. It should display the YouTube thumbnail for the correct video.
STATUS: The News Blog entry is now connected to the correct video. The next step is to publish the blog entry.
The steps to publish are covered in the News Blog Guide under Admin pages.
STATUS: The News Blog entry has the correct link to the video and is scheduled for review/publishing. Now we update the Event entry with the meeting video link.
Here are the high level steps. The Events Guide has more detailed instructions. The Event entry is created with a Zoom link button.
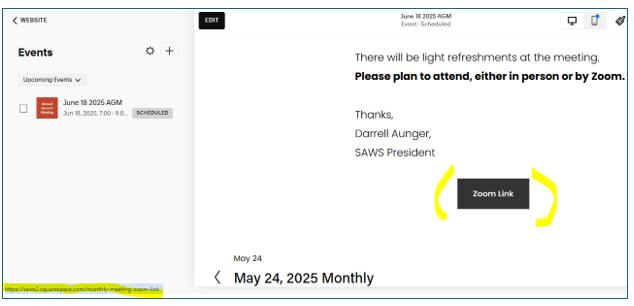
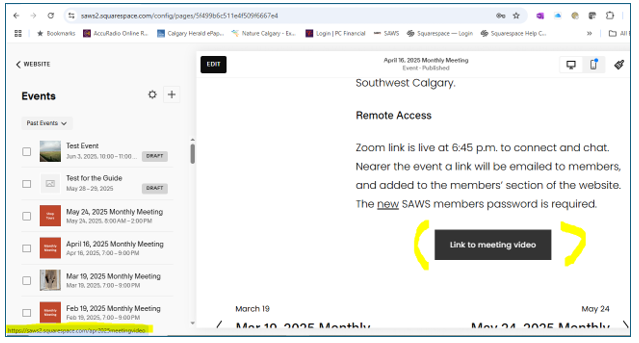
To understand the Zoom link connections, refer to the Zoom link information. The meeting has occurred so now we will replace the Zoom link button with a Link to Meeting Video button containing the link to the meeting video entry. (see images below)
Open the Event entry.
Click on EDIT.
Remove the Zoom link button.
Add a Link to Meeting video button. You can copy it from a previous entry and edit the link. Or add a button from the Add a Block menu. Then edit the button text and add the link.
SAVE your changes.
YOU ARE DONE!