
Marquetry Medley
My Mother loved to quilt and it was during trips with her, to the Tom Baker Centre, that I got the idea for this project. I am very thankful to all who participated, offered advice along the way, and patiently waited for me to get it together, literally and figuratively. The “Marquetry Medley” project started March 18, 2021, when about ten SAWS members met on Zoom, to brainstorm ideas for making something that could be used as a charity donation and showcased at the 2021 SAWS Exhibition.
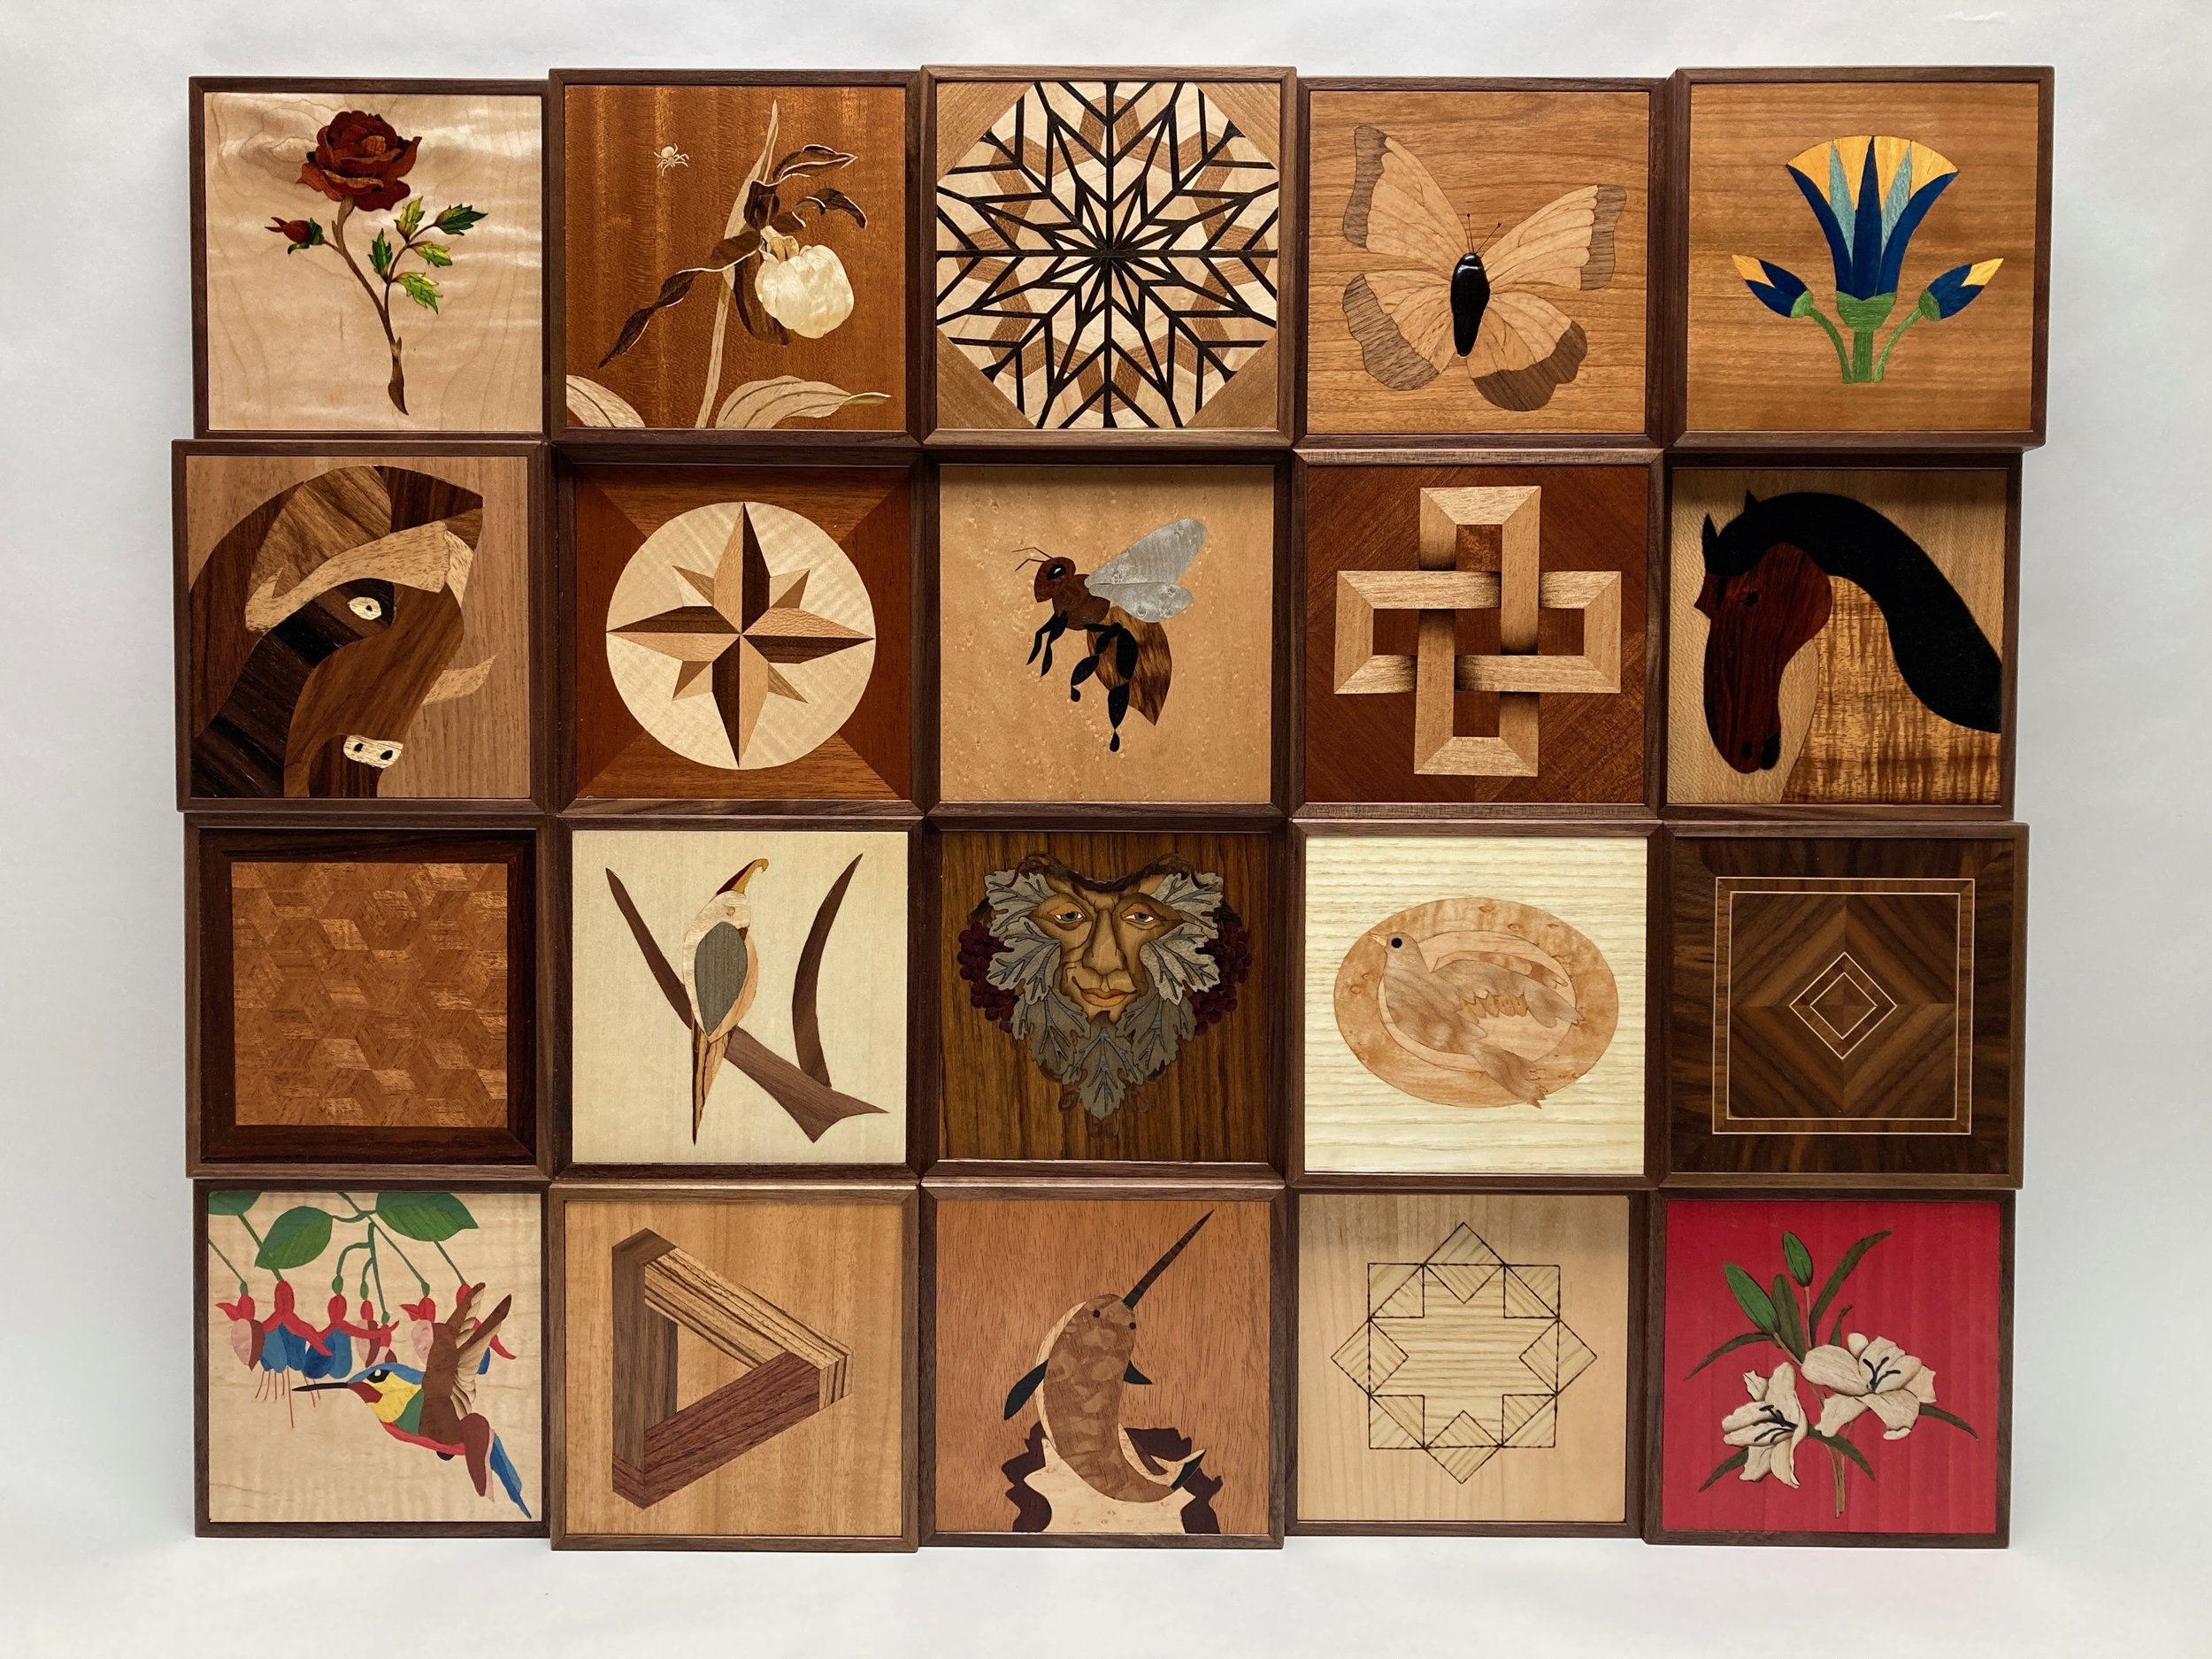
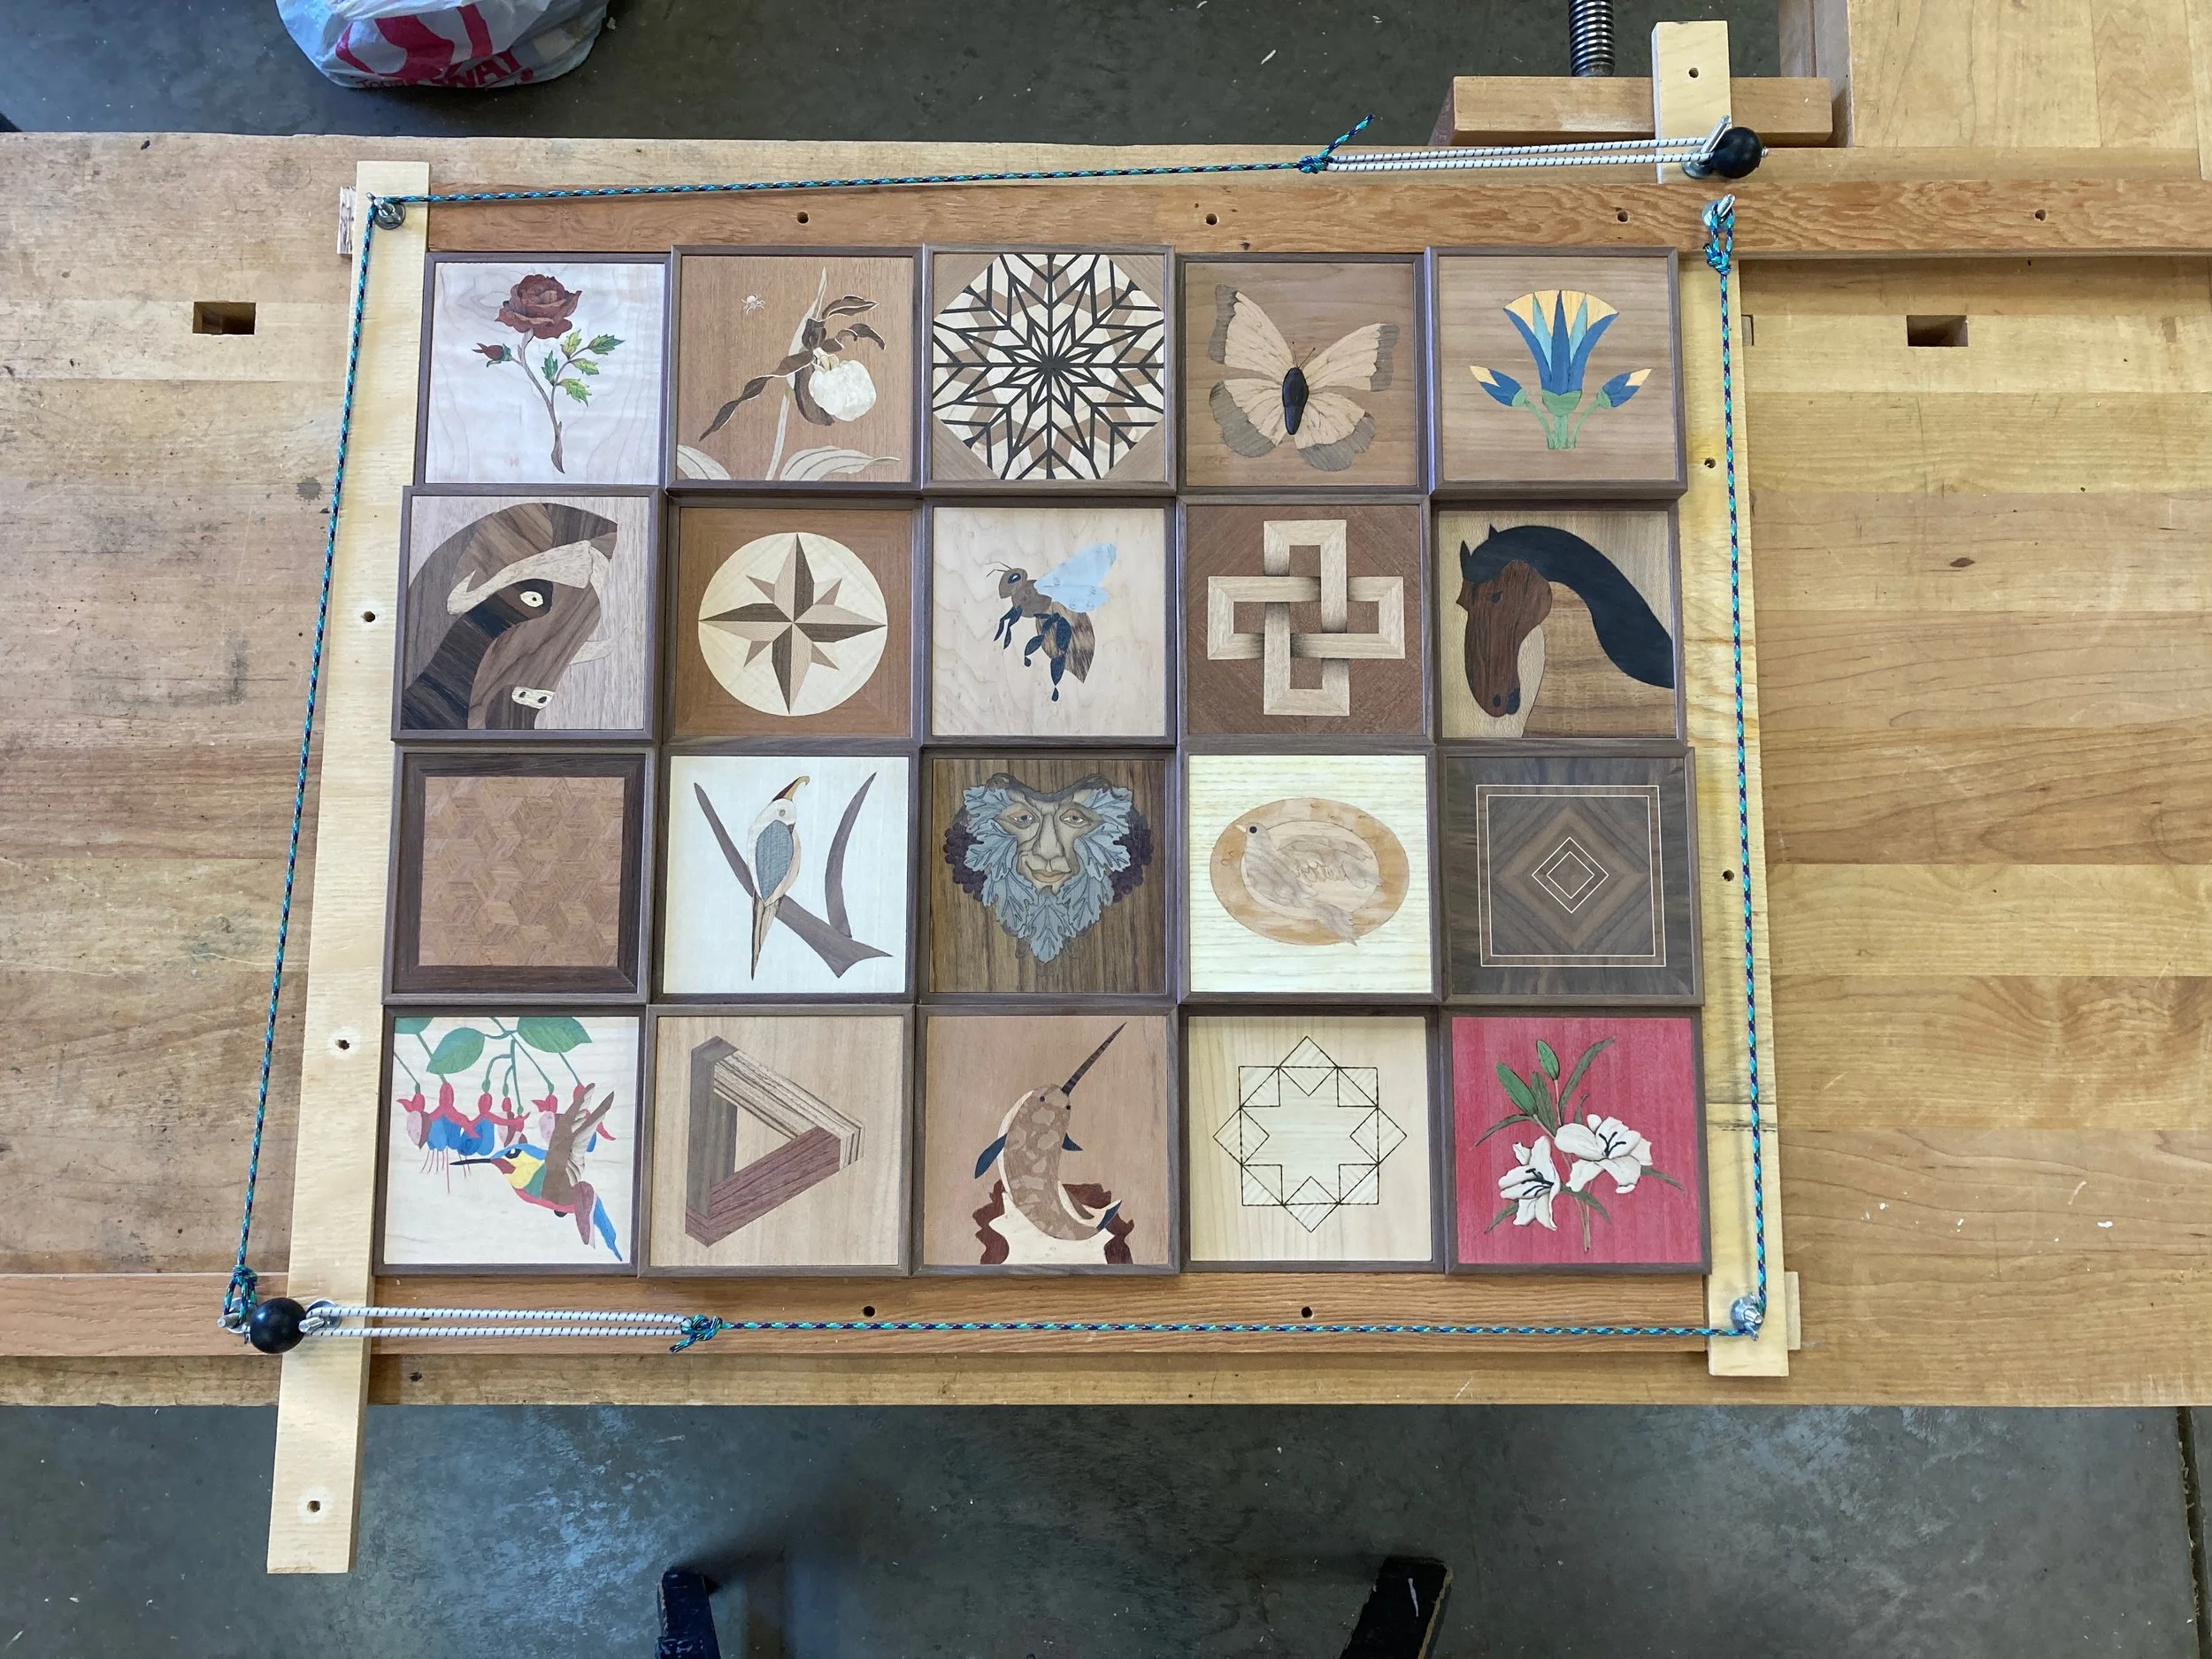
Two and a half years later, it was unveiled at the October SAWS meeting in 2023. Fourteen Marquetry/Parquetry enthusiasts, including: beginners, serious hobbyists and some Alberta Marquetry legends, contributed the squares. We have offered the assembled panel to the new Cancer Centre in Calgary and hope it will grace the walls there, for woodworkers and others to gaze upon during their treatment journeys. Paul Dean’s wife, Bonnie, summed up what I believe it represents,” … an example of what a group of people can accomplish when they work together, like how the people at the hospital are working together to help patients get better.”
The twenty squares are a wonderful collection of creativity and exemplary ‘crafts-person-ship’. I did not ask the makers to submit the story behind their square(s) but I am sure there are some.
Panel squares were contributed by:
Dave Anderson - Eckville, AB
Ryan Andrusky - Calgary, AB
Greg Browning - Calgary, AB
Ron Critchlow - Sherwood Park, AB
Paul Dean - Calgary, AB
Doug Drury - Strathmore, AB
Garry Ehrentraut - Leduc County, AB
Tam Godfrey - Calgary, AB
Gary Gunthorpe - Calgary, AB
Marian Hood - Calgary, AB
Talar Prefontaine - Calgary, AB
Greg Reed - Calgary, AB
Selim Sayegh - Calgary, AB
Jan Walker - Fort Macleod, AB
The panel’s finish was applied by Jean Claude Prefontaine - Calgary, AB.
Those of you who know me from SAWS meetings, realise I can never resist the chance to relate a story, if I think there is one there. So here are some of my anecdotes from the process of making the “Marquetry Medley”, starting way back in March of 2021.
The first square submitted
The first planning meeting was on March 18, 2021. The first squares I received were from Ron Critchlow, there were two squares inside the envelope, and the post mark was March 26, 2021. If there was an award for waiting the longest to see their contribution in the assembled project, it would go to Ron.
Why did it take 2 ½ years to complete?
Most of the participants in the initial meeting sent their squares to me in April - June 2021. However, the self-appointed person in charge, the writer of this article, can be said to have some “finishing” issues.
I was also waiting for inspiration to resolve several challenges:
how to arrange an odd number of squares in a symmetrical shape,
how to deal with the various thicknesses,
how to trim the squares to size,
how would they be attached to each other?
As time passed, various participants made polite offers to help; probably wondering if that could move the project along. After all, the 2021 Exhibition was cancelled so the initiative to finish the project could be moved to the 2023 Exhibition. Time flew by and inspiration for how to assemble the squares finally arrived late in the spring of 2023, two months before the Exhibition take-in day. But family matters needed my attention when I should have been working on it, so the 2023 Exhibition also slipped by. Then in late September, I had some time, and with a vision; I was ready to make things happen.
How did we get twenty squares?
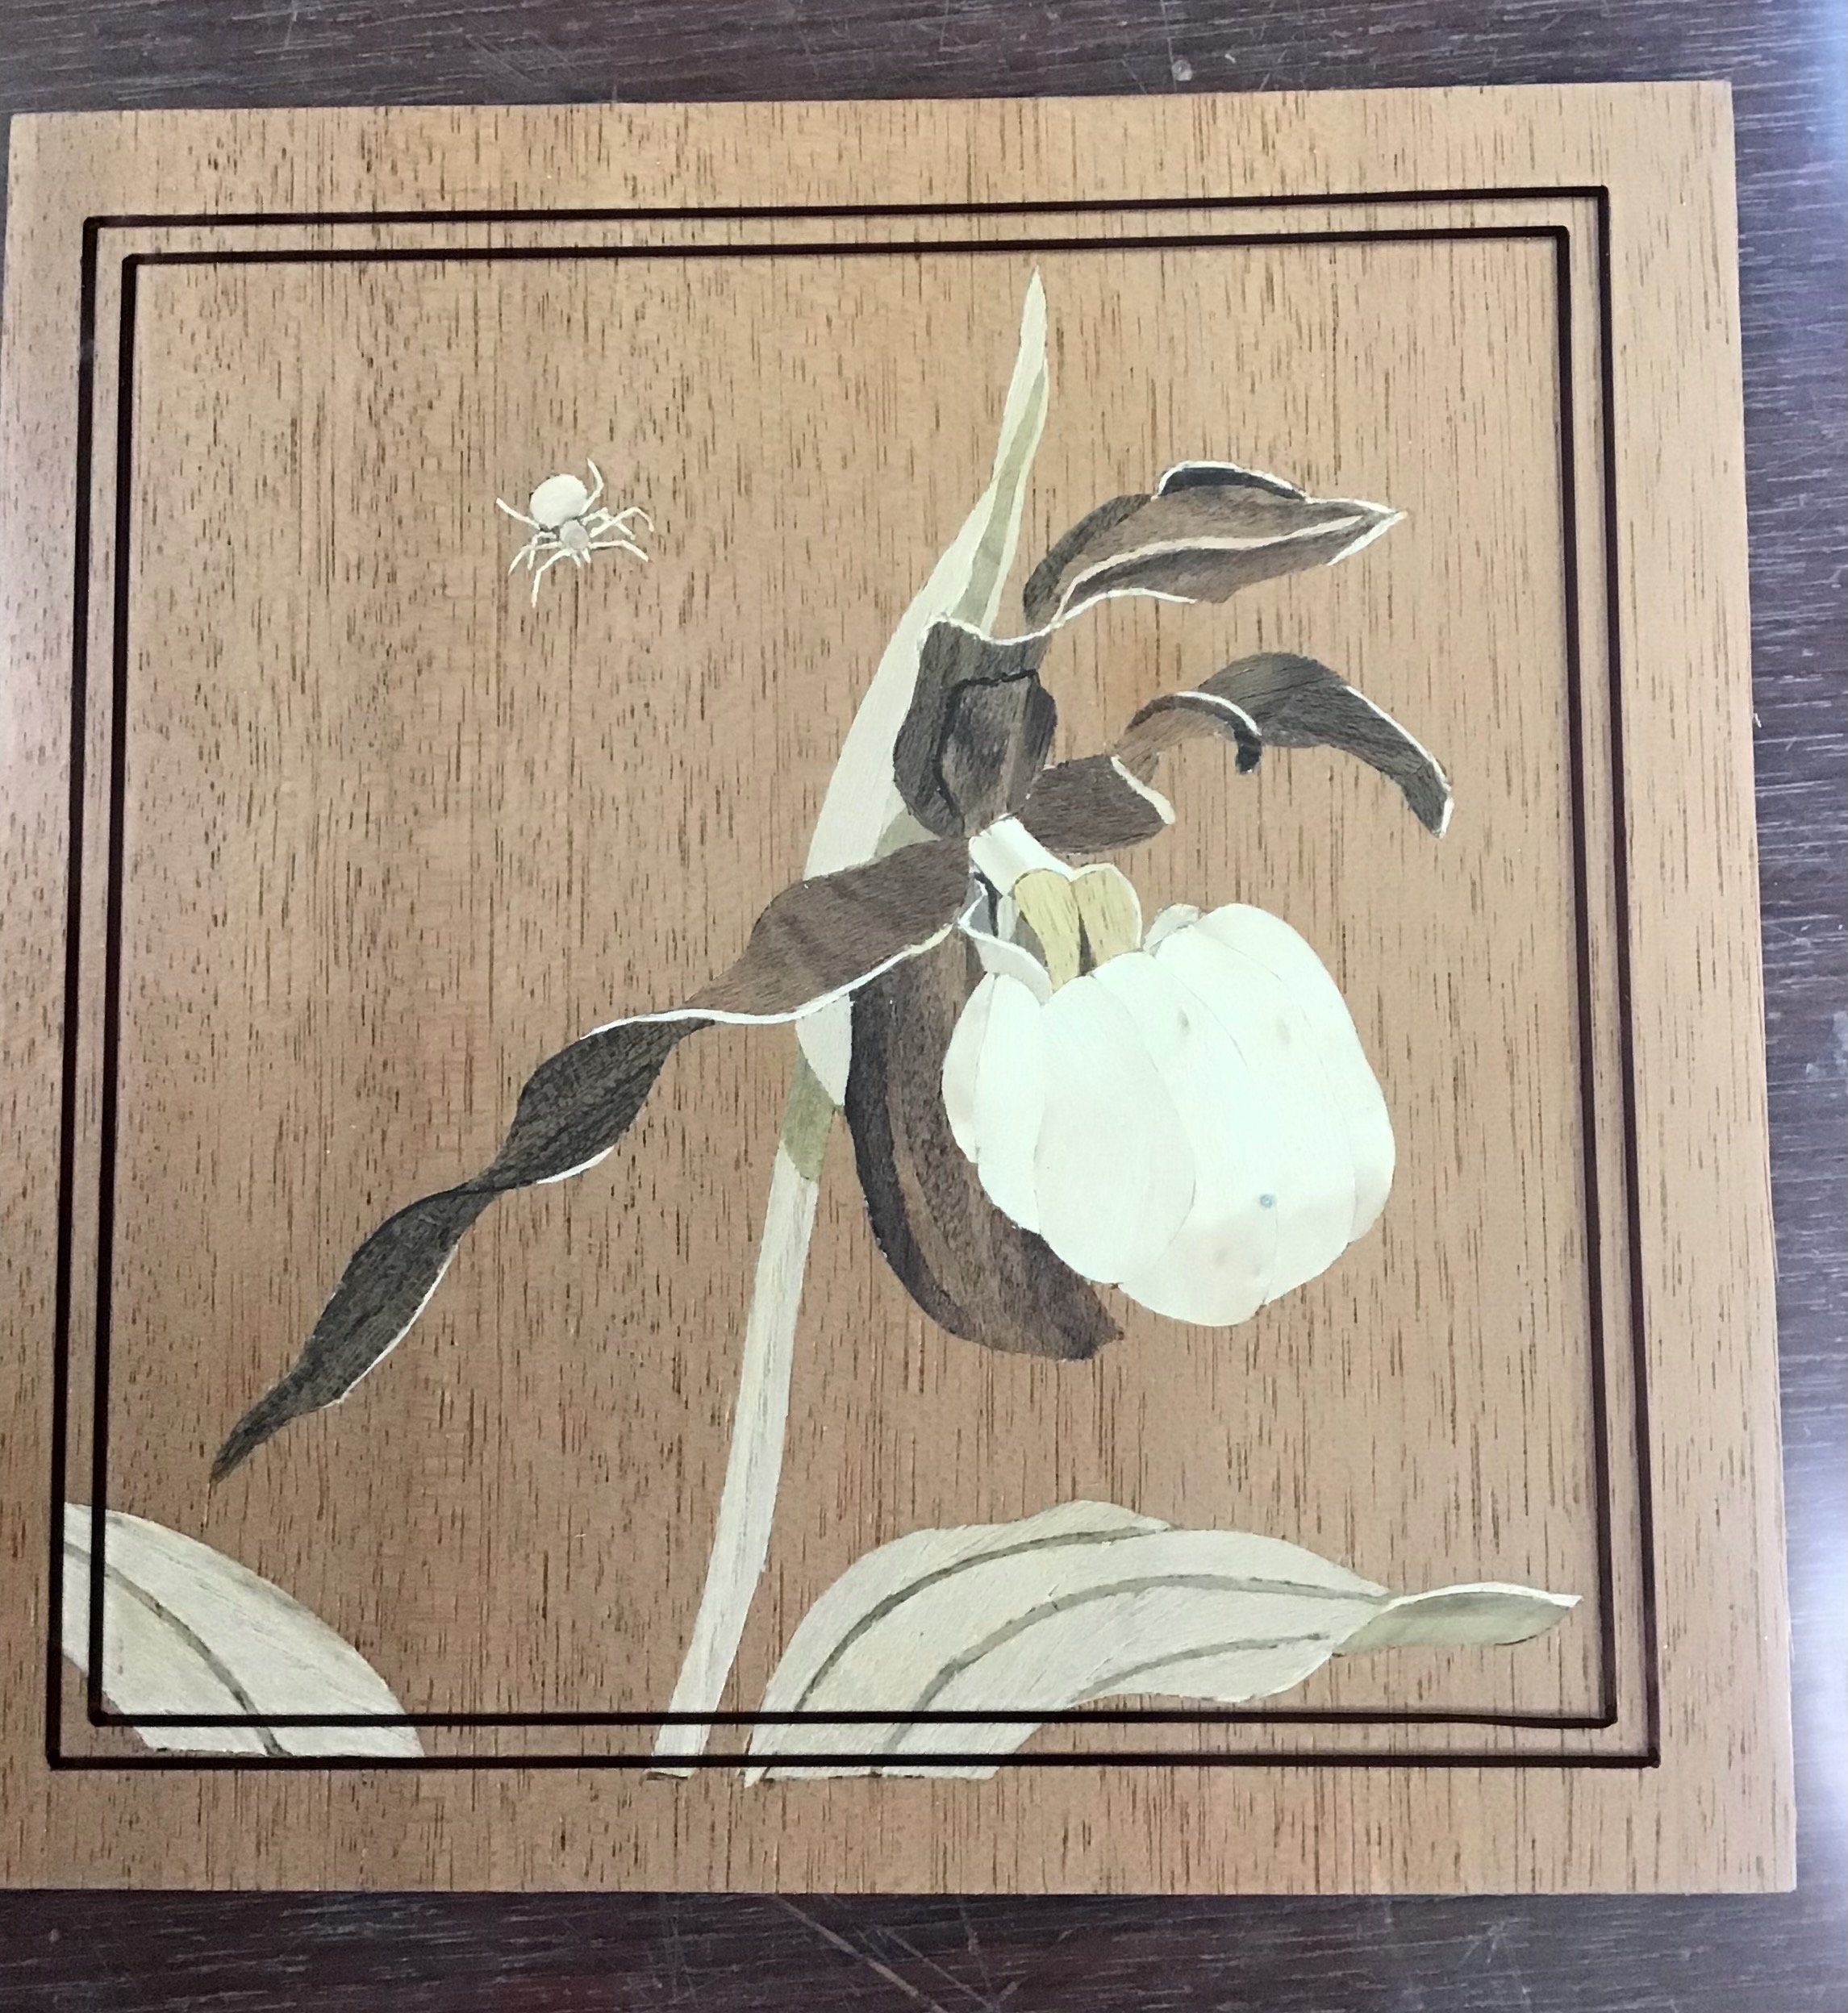
By June 2021 about thirteen squares were already submitted. They were impressive!

The first thirteen squares.
For the next year and a half, I enjoyed showing the squares to others, especially those with an interest in marquetry. I took them to a few SAWS meetings and the Calgary Stampede Western Showcase booth in 2021 and 2022. When people saw the collection, those that could, agreed to contribute a square so the collection grew to nineteen. Nineteen squares still cannot be arranged symmetrically, but they were all great, so how could I choose to return any to their makers? Then we happened to see Paul Dean’s work in the Western Showcase at the 2022 Calgary Stampede. Ryan followed up on Paul’s contact information and we arranged to meet him. Paul was willing to make a square for the project! Now we had twenty squares so we could make a 4X5 or 5X4 arrangement.

The twenty squares before they were trimmed.
How would we attach the squares together?
Right from the beginning there were discussions about how to assemble the squares.
The challenges were:
dealing with various thicknesses of the squares,
should there be borders between them,
covering the edges of the substrates,
designing a frame that would not distract from the marquetry
As time went by, more ideas for assembling the squares were proposed but solutions to the logistical difficulties and frequent distractions in my life delayed any of the plans getting very far.
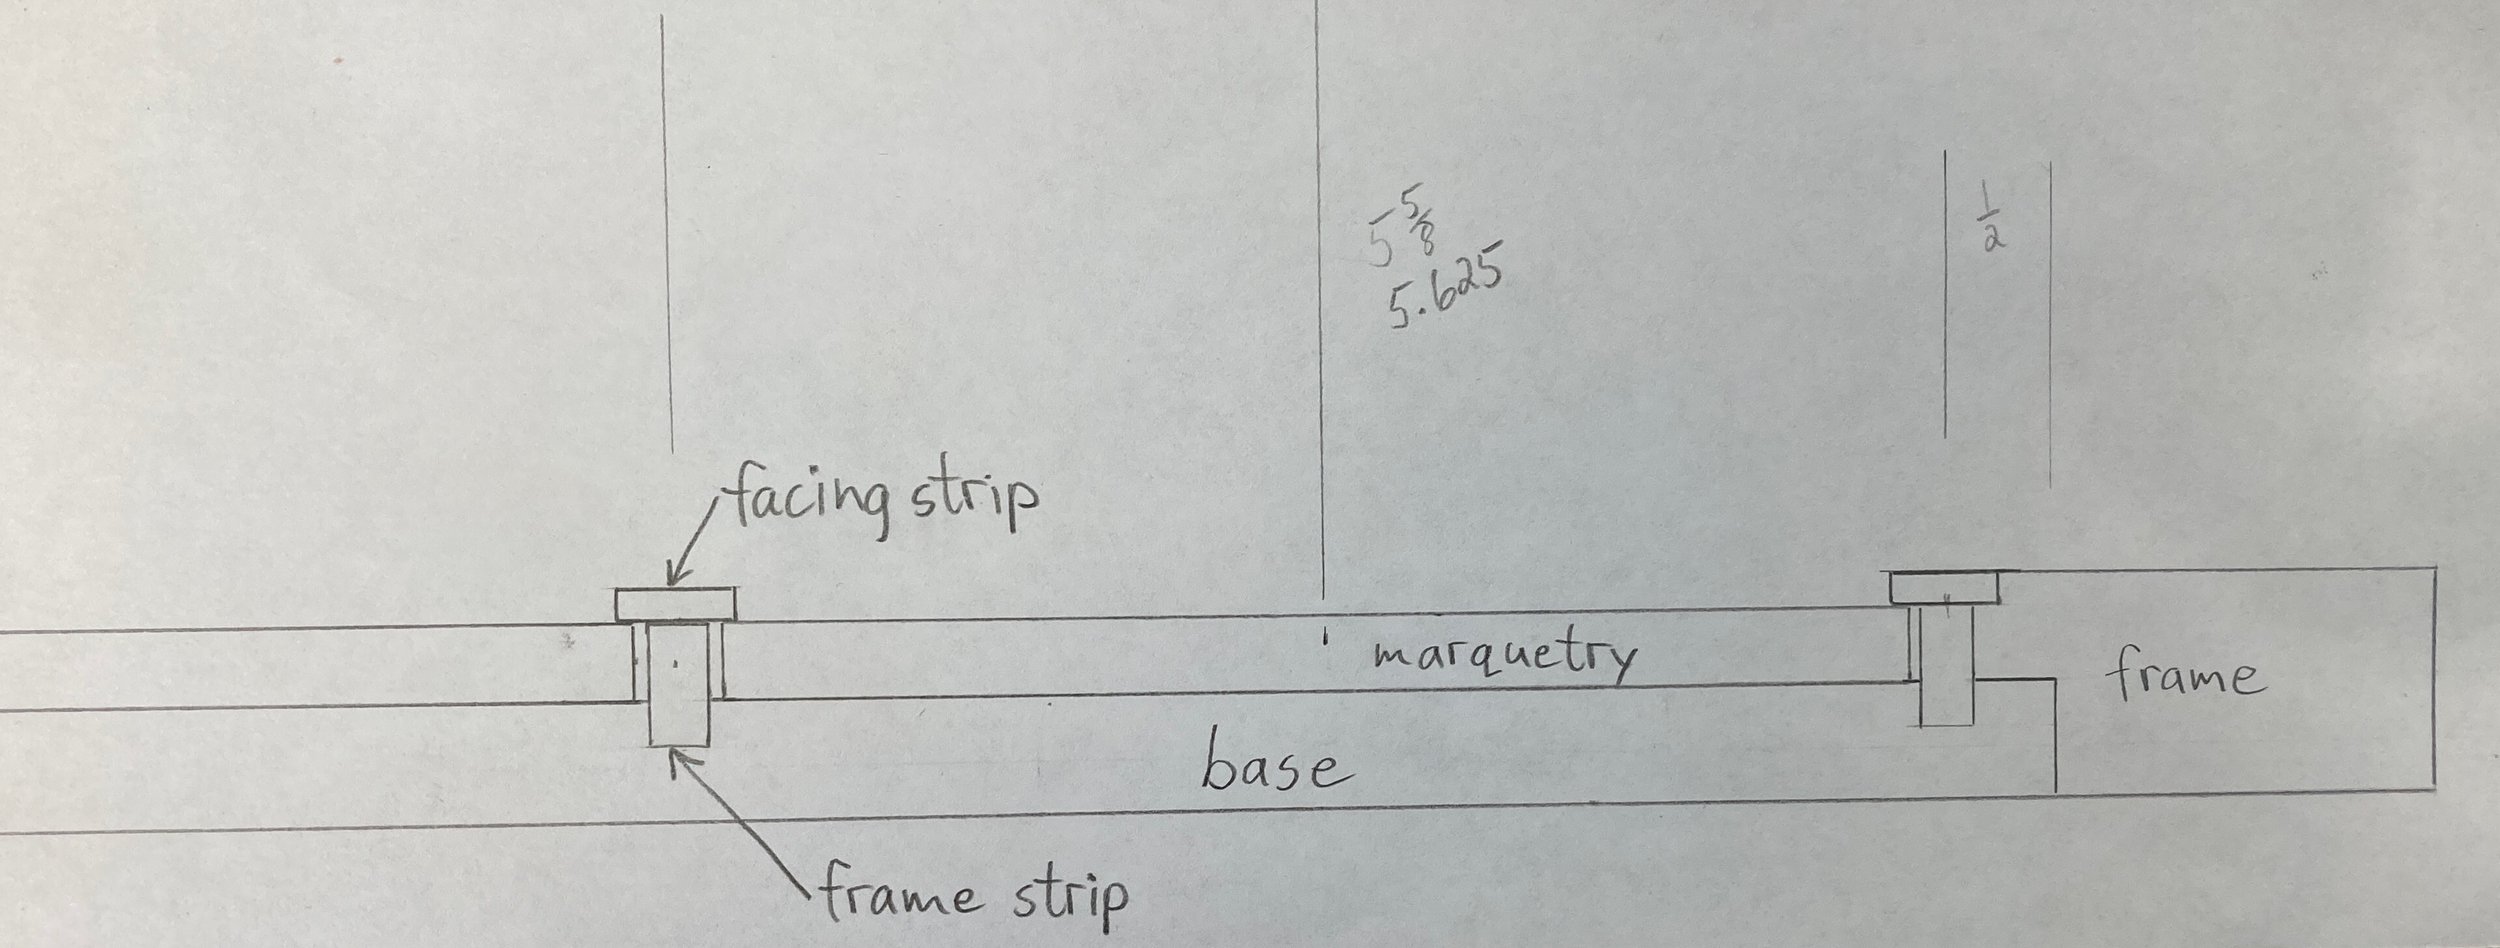
One plan was to cut a perfect grid of grooves into a backing, put strips into the grooves to separate the marquetry squares, trim and glue the marquetry squares into the spaces. Then to make a lattice of facing strips to cover the gaps, and frame the marquetry squares. However, this plan was trialled and abandoned.
Drafting of the grooved base idea.

A trial of the grooved base idea. Cut a lattice of grooves into a backing, install strips in the grooves, fit the marquetry into the spaces and attach a facing over the strips.
In hindsight, I am grateful we did not have a firm assembly plan at the beginning. The muddling around gave us the opportunity to recruit more contributors and their squares have added greatly to the interesting variety in the piece. There are seven parquetry patterns, and thirteen marquetry squares, including plant, animal and insect subjects. Seventeen were cut with knife techniques and three were cut using a chevalet and traditional French Marquetry methods.

“Tam’s homemade chevalet” - to give you an idea of the ones used in French Marquetry.
Idea for the multi-height frames
In April 2023 Wendy and I were at the ASA Gallery (Alberta Society of Artists) in Crossroads Market, picking up some art she had exhibited there. Coincidentally there were two multi-height collaborative art pieces at the entrance. When I saw them, I finally knew how our “Marquetry Medley” should be assembled. It would involve making twenty frames, more precisely than I have ever made in my life and trimming the marquetry squares to fit perfectly in them. But as Wayne Arthur, one of my mentors from long ago used to tell me, “If it’s not difficult, we’re not interested”.
Deciding where to trim the pieces
I needed to make all of the marquetry pieces exactly the same size and perfectly square while not ruining anyone’s work in the process. The Marquetry/Parquetry pieces were intentionally made oversize and glued to a substrate, but were not necessarily perfectly square with the edges of that substrate. We needed to decide what parts would be trimmed off, then make a first cut lined up with the marquetry picture or parquetry pattern, followed by a second cut that was perfectly perpendicular to the first. After that, the last two cuts could be ripped parallel to the two sides established above.
Template used to determine where to make the first two cuts. 5 in. and 5.25 in. outlines on a piece of acetate.
Trimming the squares to the same size
Luckily, early in June 2023, Dave Anderson shared plans for an L-Fence with me. I do not know if he knew it at the time, and I admit it took me a while to realise it, but you can use an L-fence to flush trim to a line drawn anywhere across a piece of wood. You attach a straight edge where you want to cut and the straight edge registers against the L-fence. I needed to build an L-fence. Thank you, Dave, for sharing the plans and pictures of the one you built. Now I have one too. It worked superbly and is a very useful addition to my shop.

A piece of parquetry prepared for flush trimming with the L-fence. The straight edge is positioned on the cut line and held to the parquetry with gentle, double-sided tape.
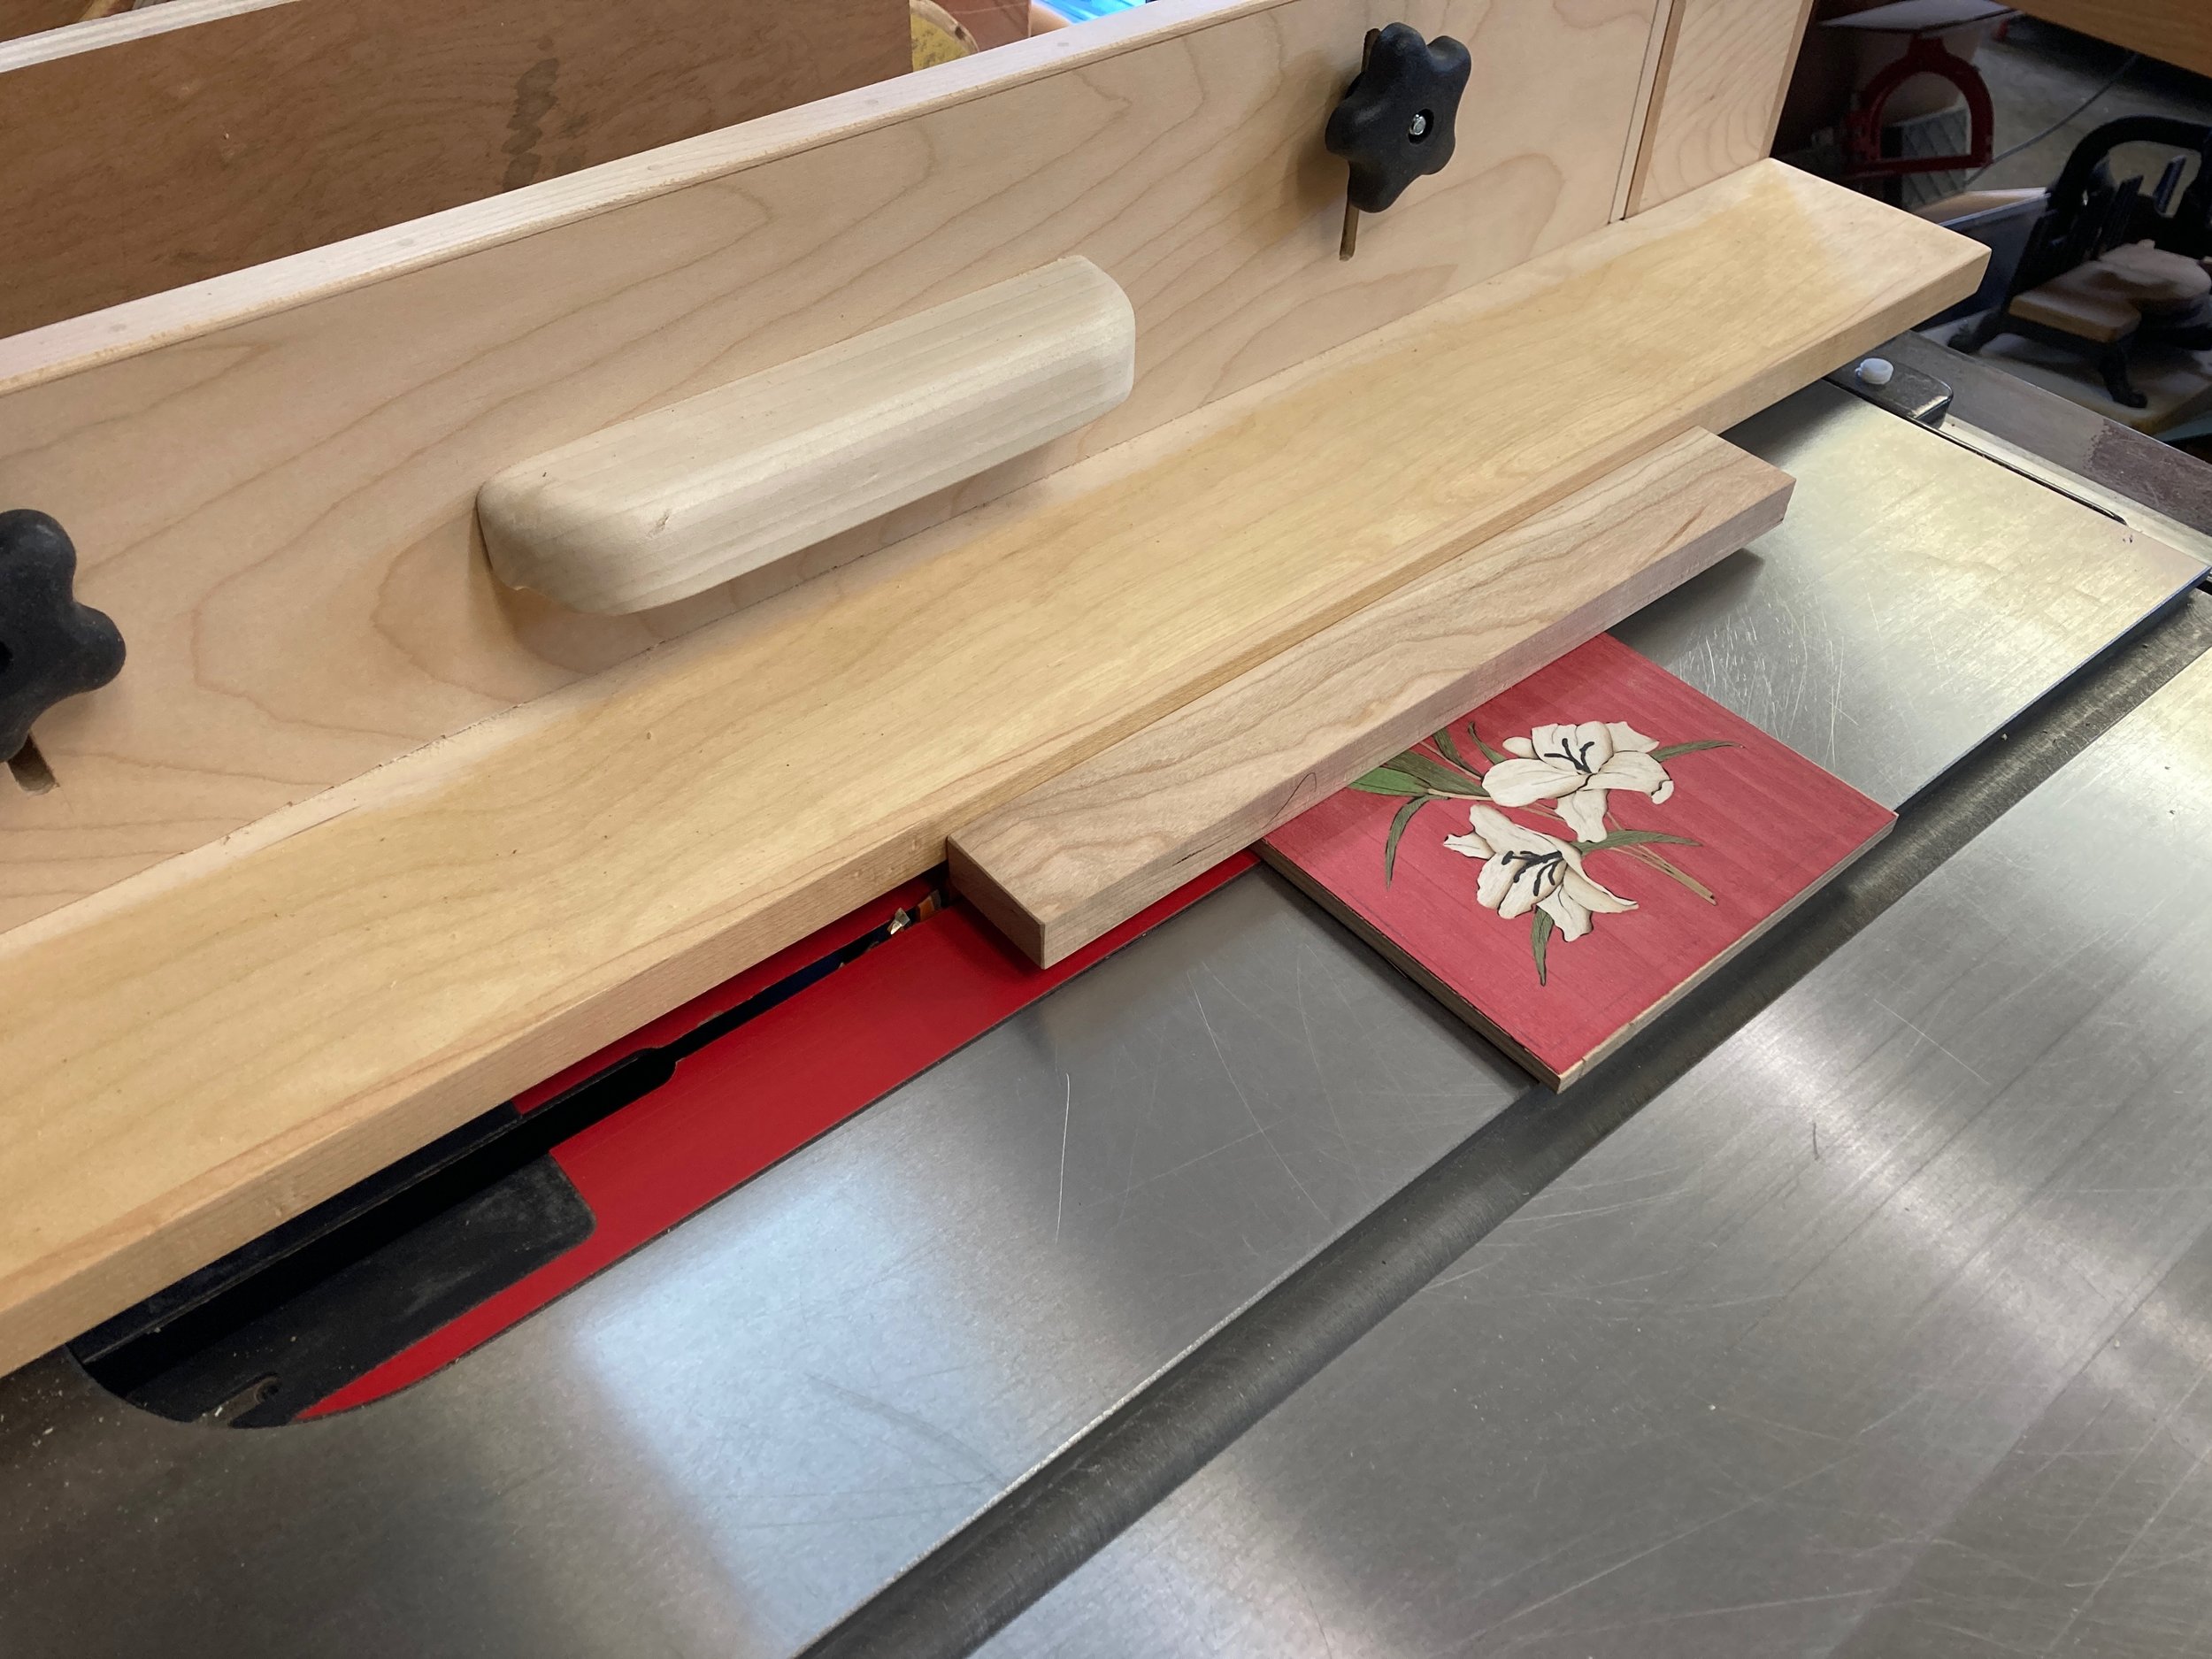
L-fence - using the straight edge to guide the first trimming cut.
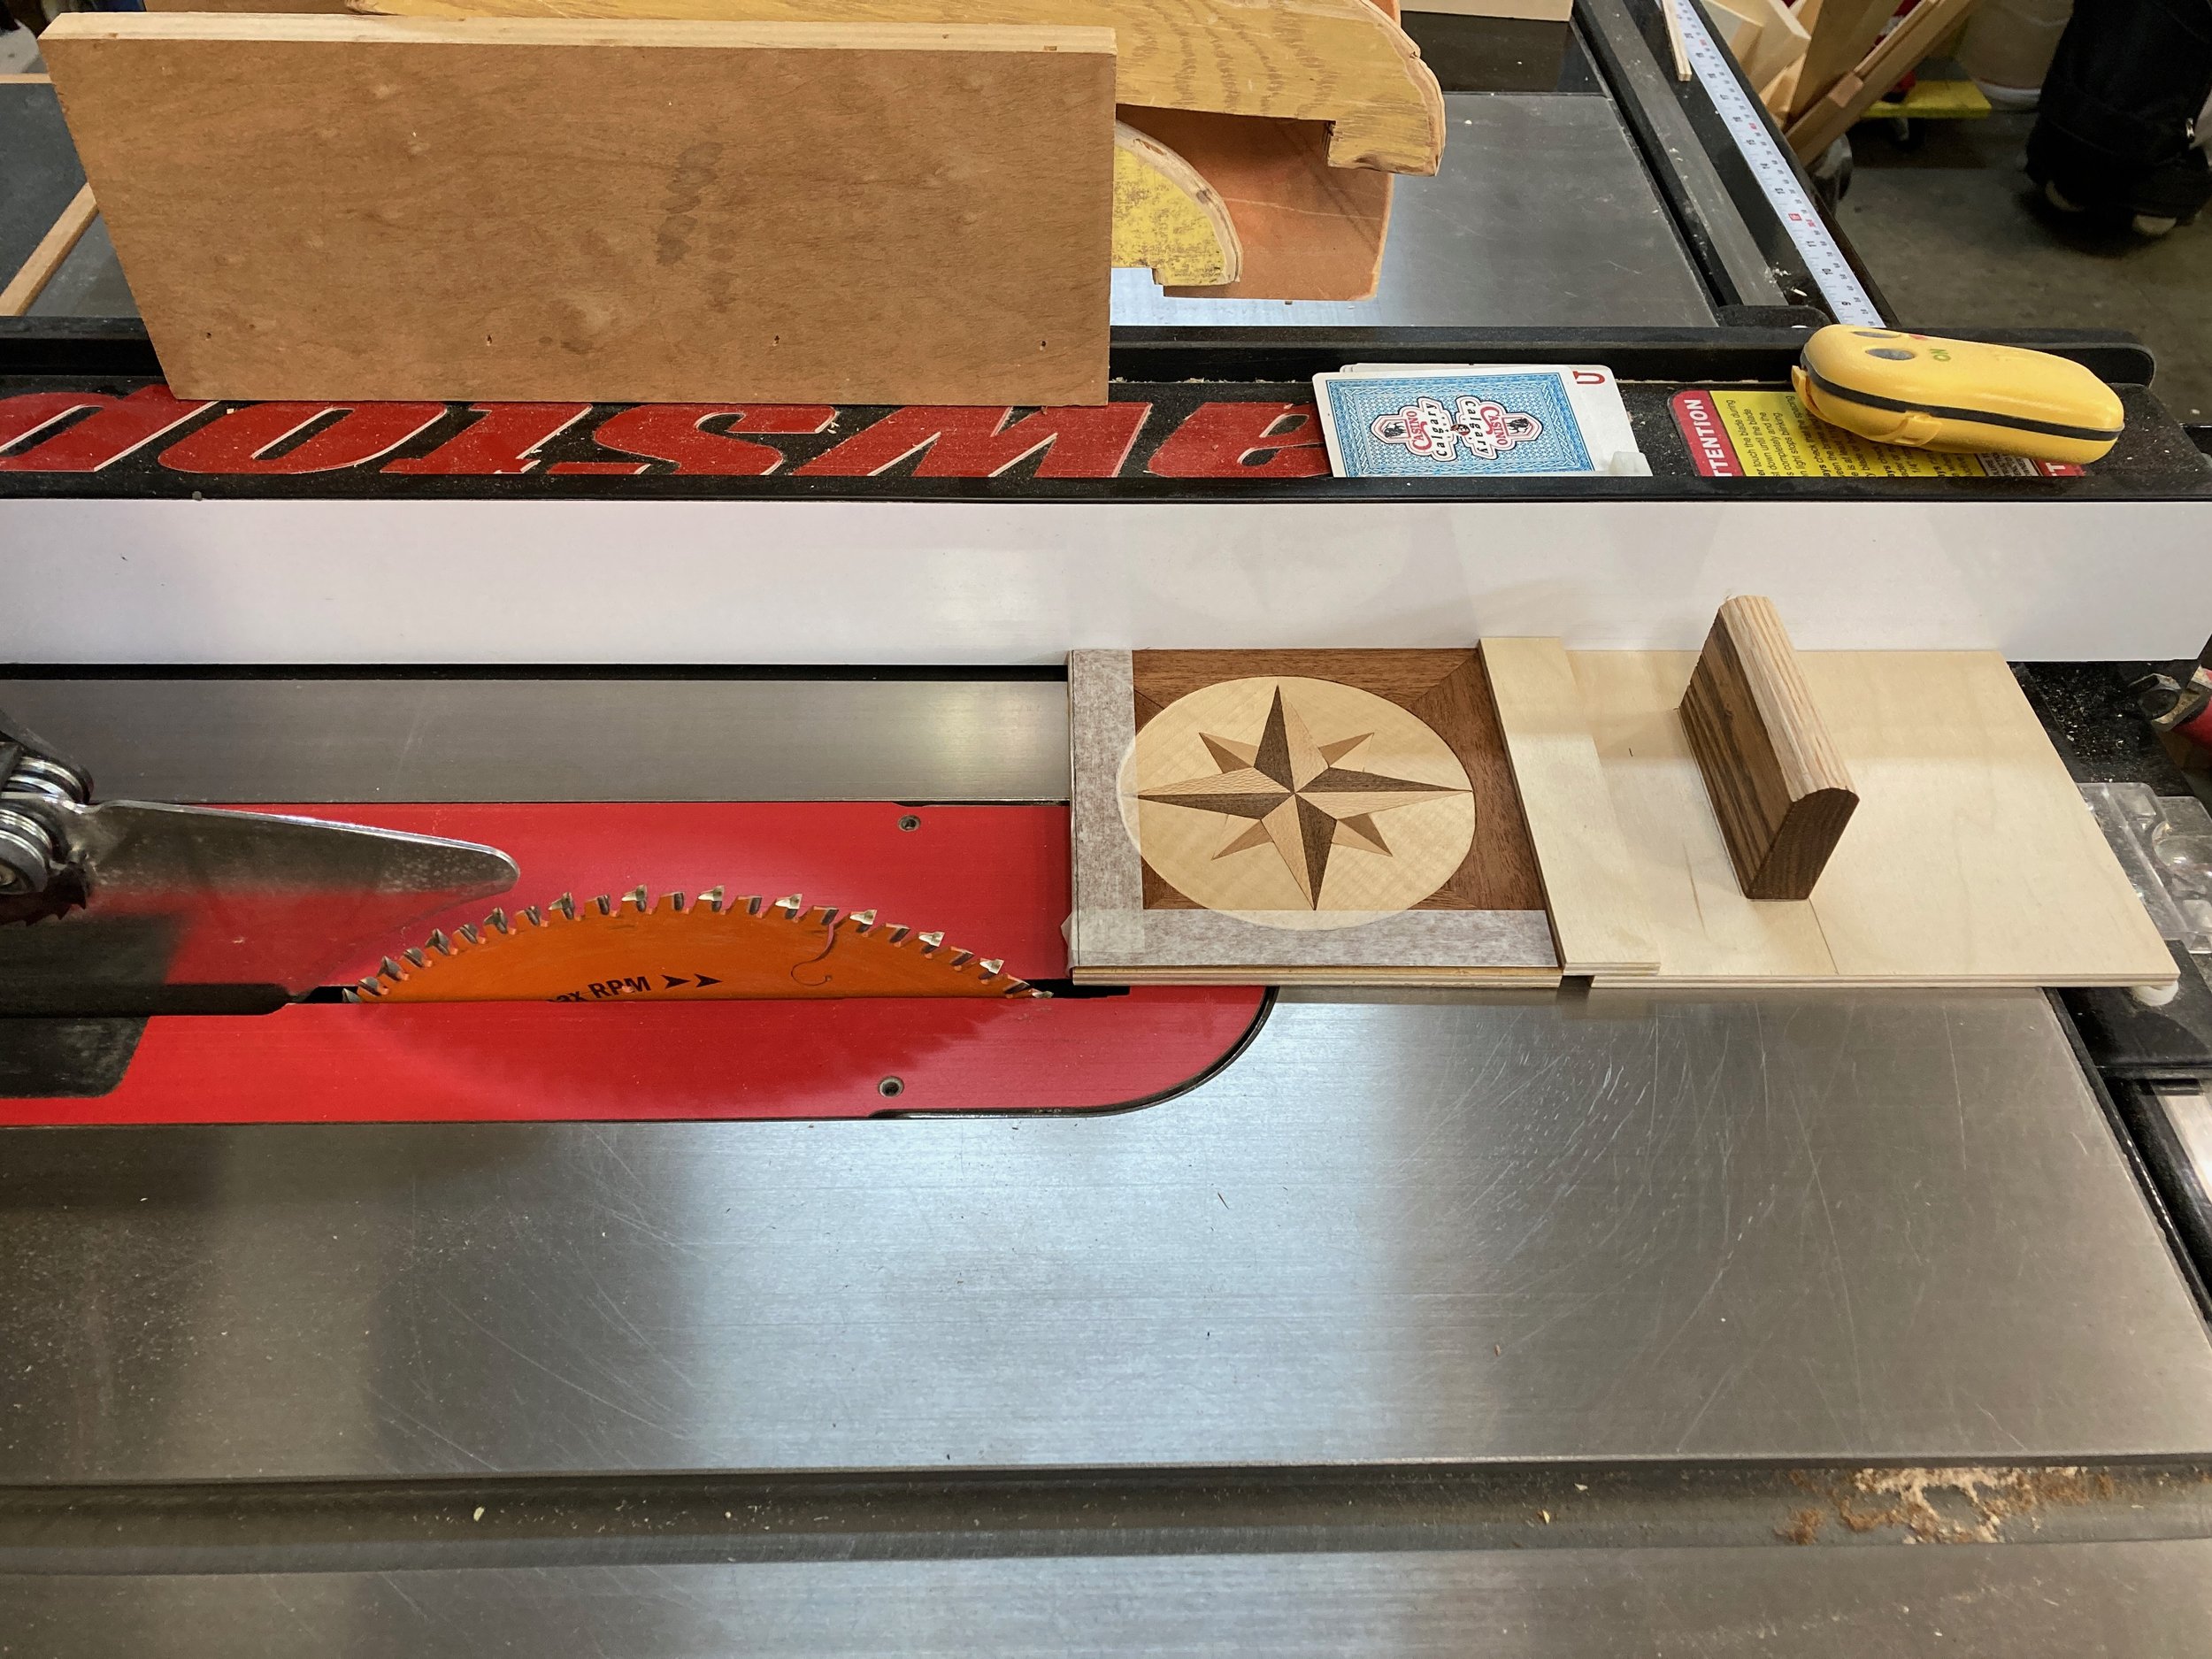
The third and fourth trimming cuts - ripping the other sides parallel. Push block to prevent grain tear out at the end of the cut. I also put veneer tape on the third and fourth sides, to help prevent tear out. (But later it proved to be very difficult to remove.)
Building 20 small frames all exactly square and the same size
I trimmed the marquetry squares first and built the frames to fit. My strategy was that once the Marquetry/Parquetry squares were perfect, I could continue building frames, over and over, if necessary, until I got them to fit. I did not want to risk trimming any squares again.
The frames would be made by machining rabbeted strips of four different heights, then cutting the mitres on the table saw with the blade tilted to 45º, using a sled with a micro adjust fence stop to dial in the length of the frame’s sides. Thank you to Ted Branton for the feature filled sled that he shared in the January 2023 SAWS Show & Tell meeting. I built a sled with a 45º tilt slot and a micro-adjust fence stop. Then I made about twelve pine frames to test the above process. I wanted to prove that I could cut the frames as accurately as I wanted them. It also gave me a chance to see how the four heights I chose looked when they were next to each other.
Everything worked! Now I could cut black walnut with confidence!
Along with all the other coincidences of this project, Jared Howkins was in the process of placing a sizable order for some good quality black walnut at the time and let me participate in the deal he was getting.

Rabbeted frame strips ready to be mitred.

45-degree mitre-cutting sled with micro-adjust fence stop.

Trimmed squares and four pine practice frames.

Dry fitting the squares & frames together before glueing begins. Everything is held together with friction and blue tape..
Glueing the squares to the others with a scissor squeeze device. The holes in the frame allowed for adjusting the number of squares it could squeeze. It was used for the first four-square glue up; then nine squares, when five were glued to the original four; then sixteen, when seven more were added to the nine that were already glued; and finally, twenty squares when the last four squares were glued to the sixteen.
Sanding and preparing for the finish
The squares needed some repair, as a result of wear and tear during two years of handling and there was some damage from my trimming methods. There are some subtle techniques I know now, that could have prevented some of that damage. As well there were two other practices I would like to warn everyone about; they added some difficulties that could have been avoided.

Trimmed squares with veneer tape still on them.
If a veneer piece has been sanded:
do not put pencil lines directly on it,
do not put veneer tape on it.
Both can be difficult to remove. This problem caused me some stress, so thank you for the advice several participants passed on. I tried those ideas on mock-ups first, because I feared damaging the marquetry squares. The final verdict turned out to be gentle sanding with sanding boards using a very fine grit. Ryan and Paul spent several afternoons at my shop helping with the trimming, repairs and sanding. The squares needed to be perfect before they were glued into the frames.
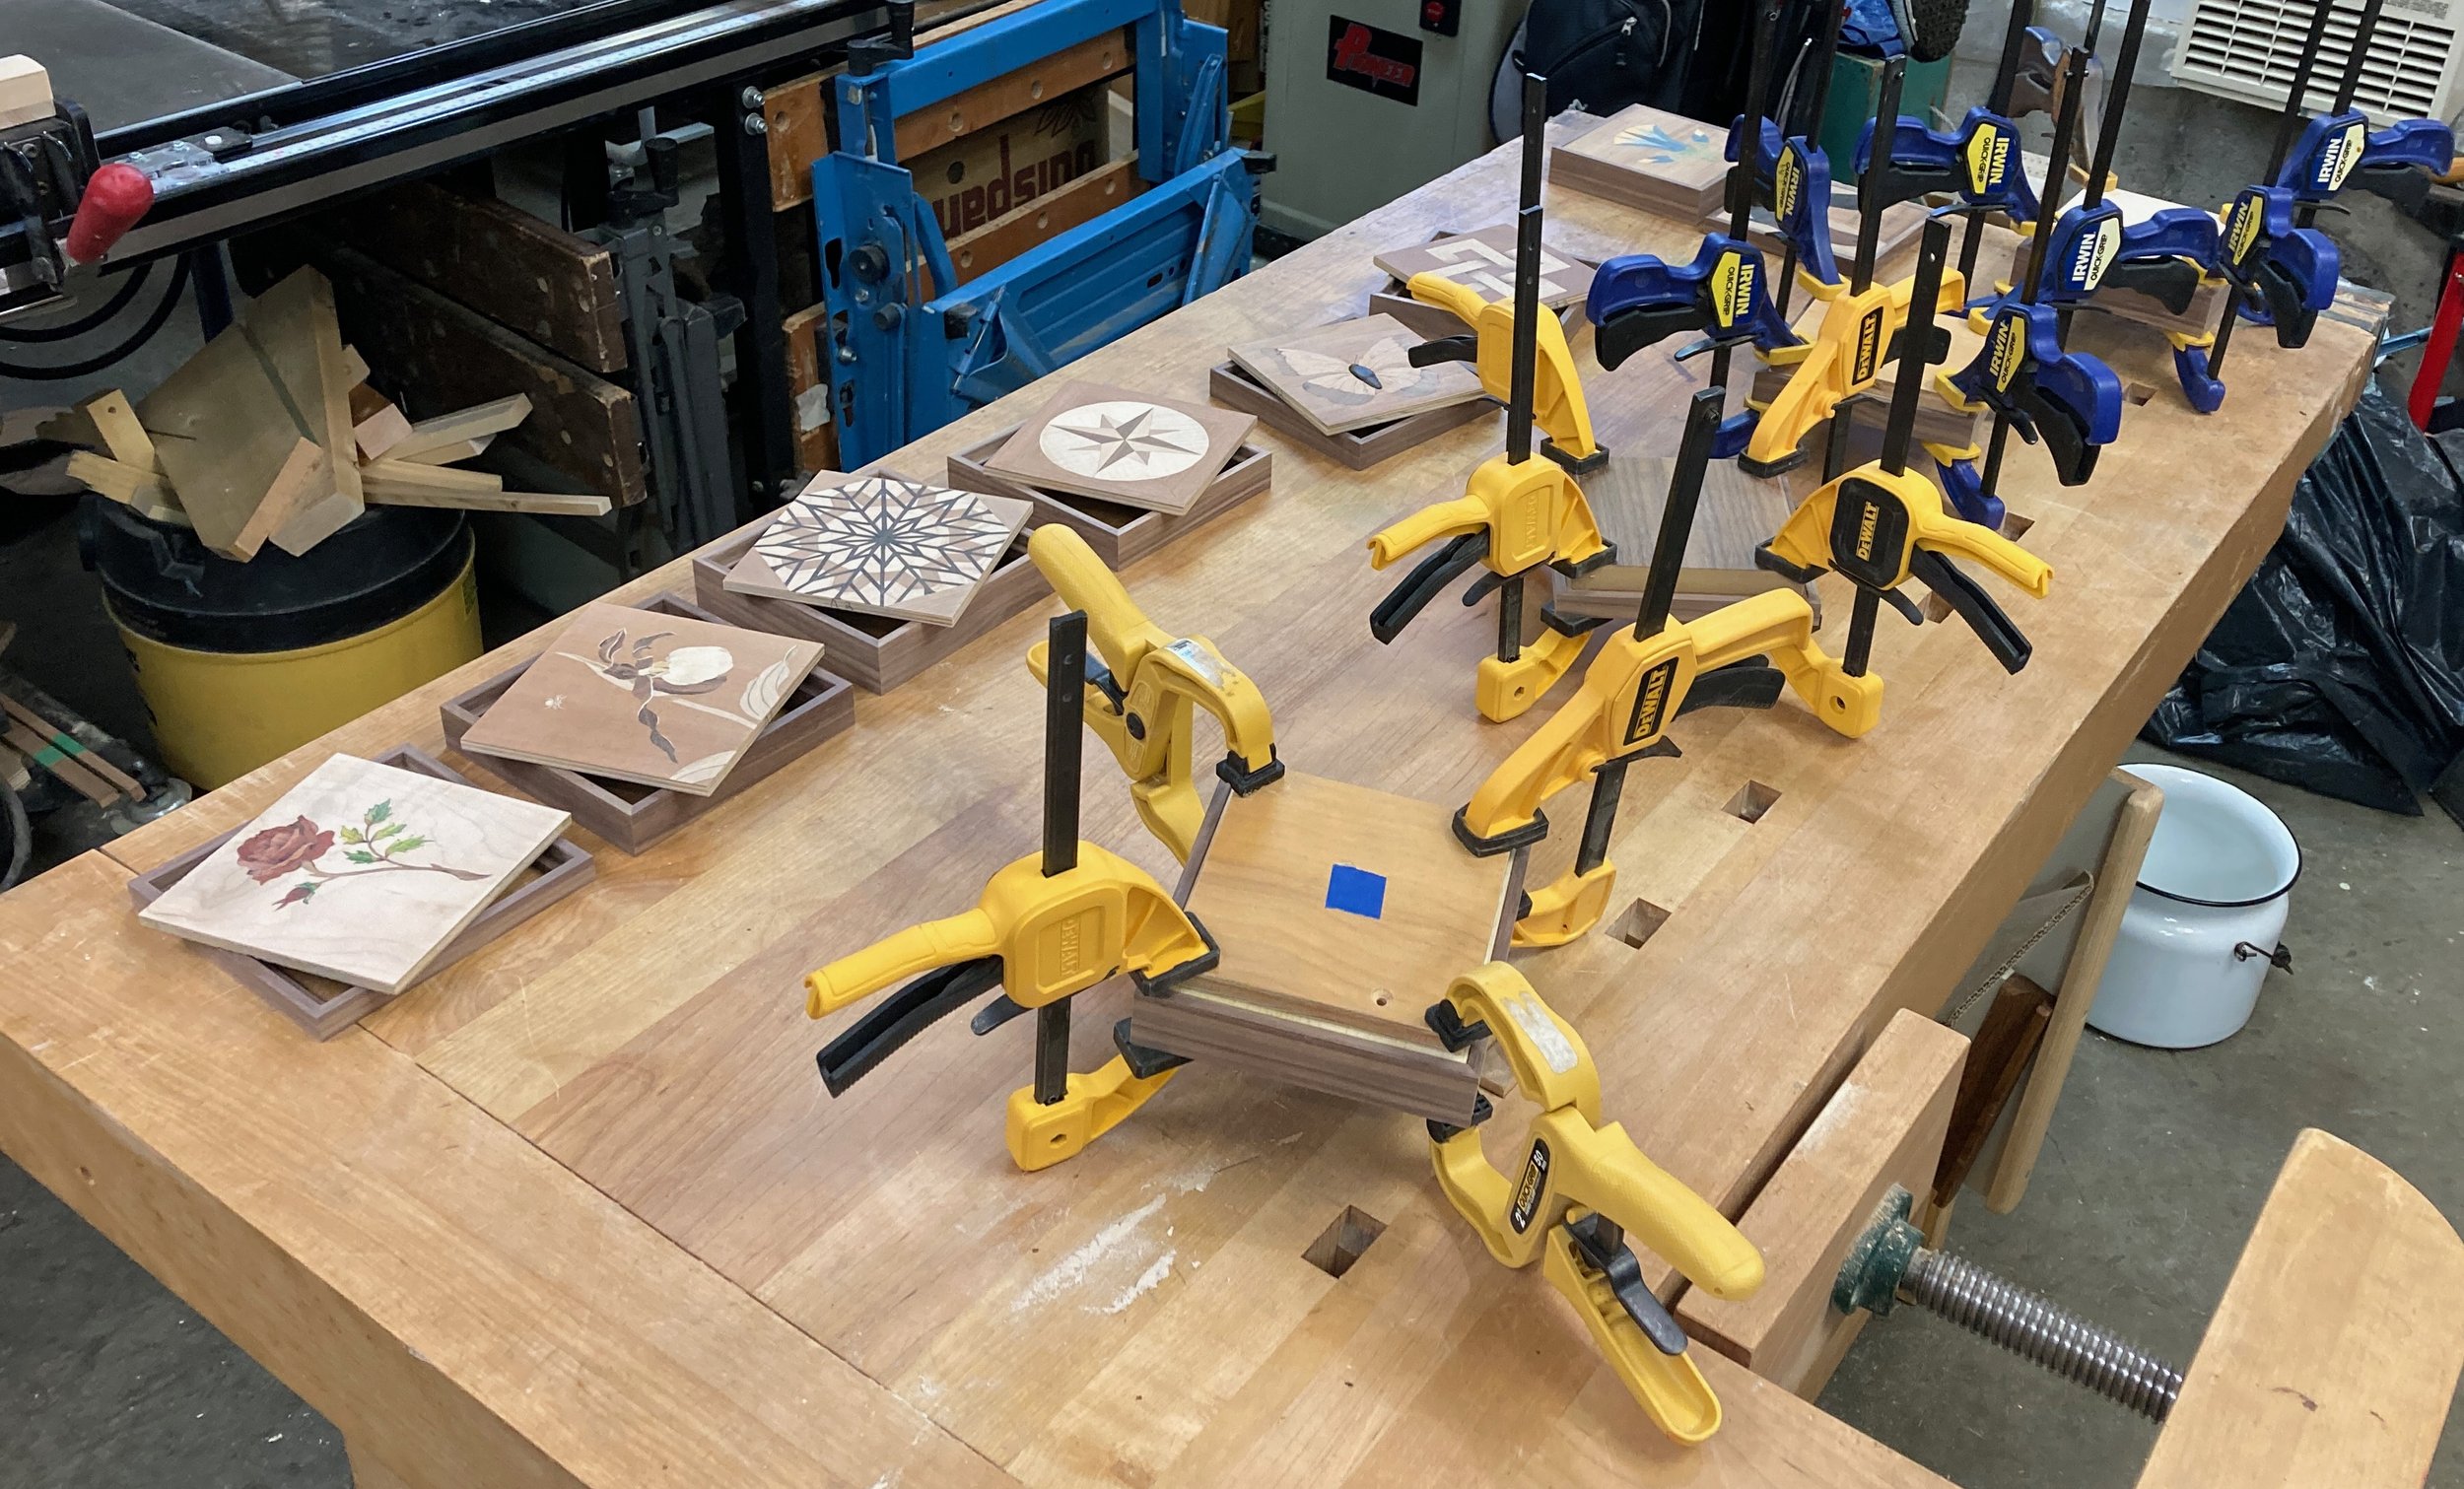
Glueing marquetry squares into frames. The frames were already glued together at this stage.
Final arrangement of the squares and finishing
Talar Prefontaine completed a square early in the project and her husband Jean Claude offered to apply a lacquer finish when it was completed. Little did they know how long it would be before the project was completed or how many times, I would seek their advice. We had a few cups of tea during those “working” visits. It gave me a chance to get to know them and recognize their unwavering commitment to excellence. They helped me stay focused on the value of paying attention to fine details. Their input was also greatly appreciated when arranging the squares. It was very important to arrange them to complement each other. Squares with colour and flowers ended up in the corners, the parquetry squares form some diagonals, and the animal/insect/plants make other diagonals that interlock with the diagonals formed by the parquetry diagonals. The final arrangement gives the overall piece a pleasant balance.

Front view of Marquetry Medley with finish applied.
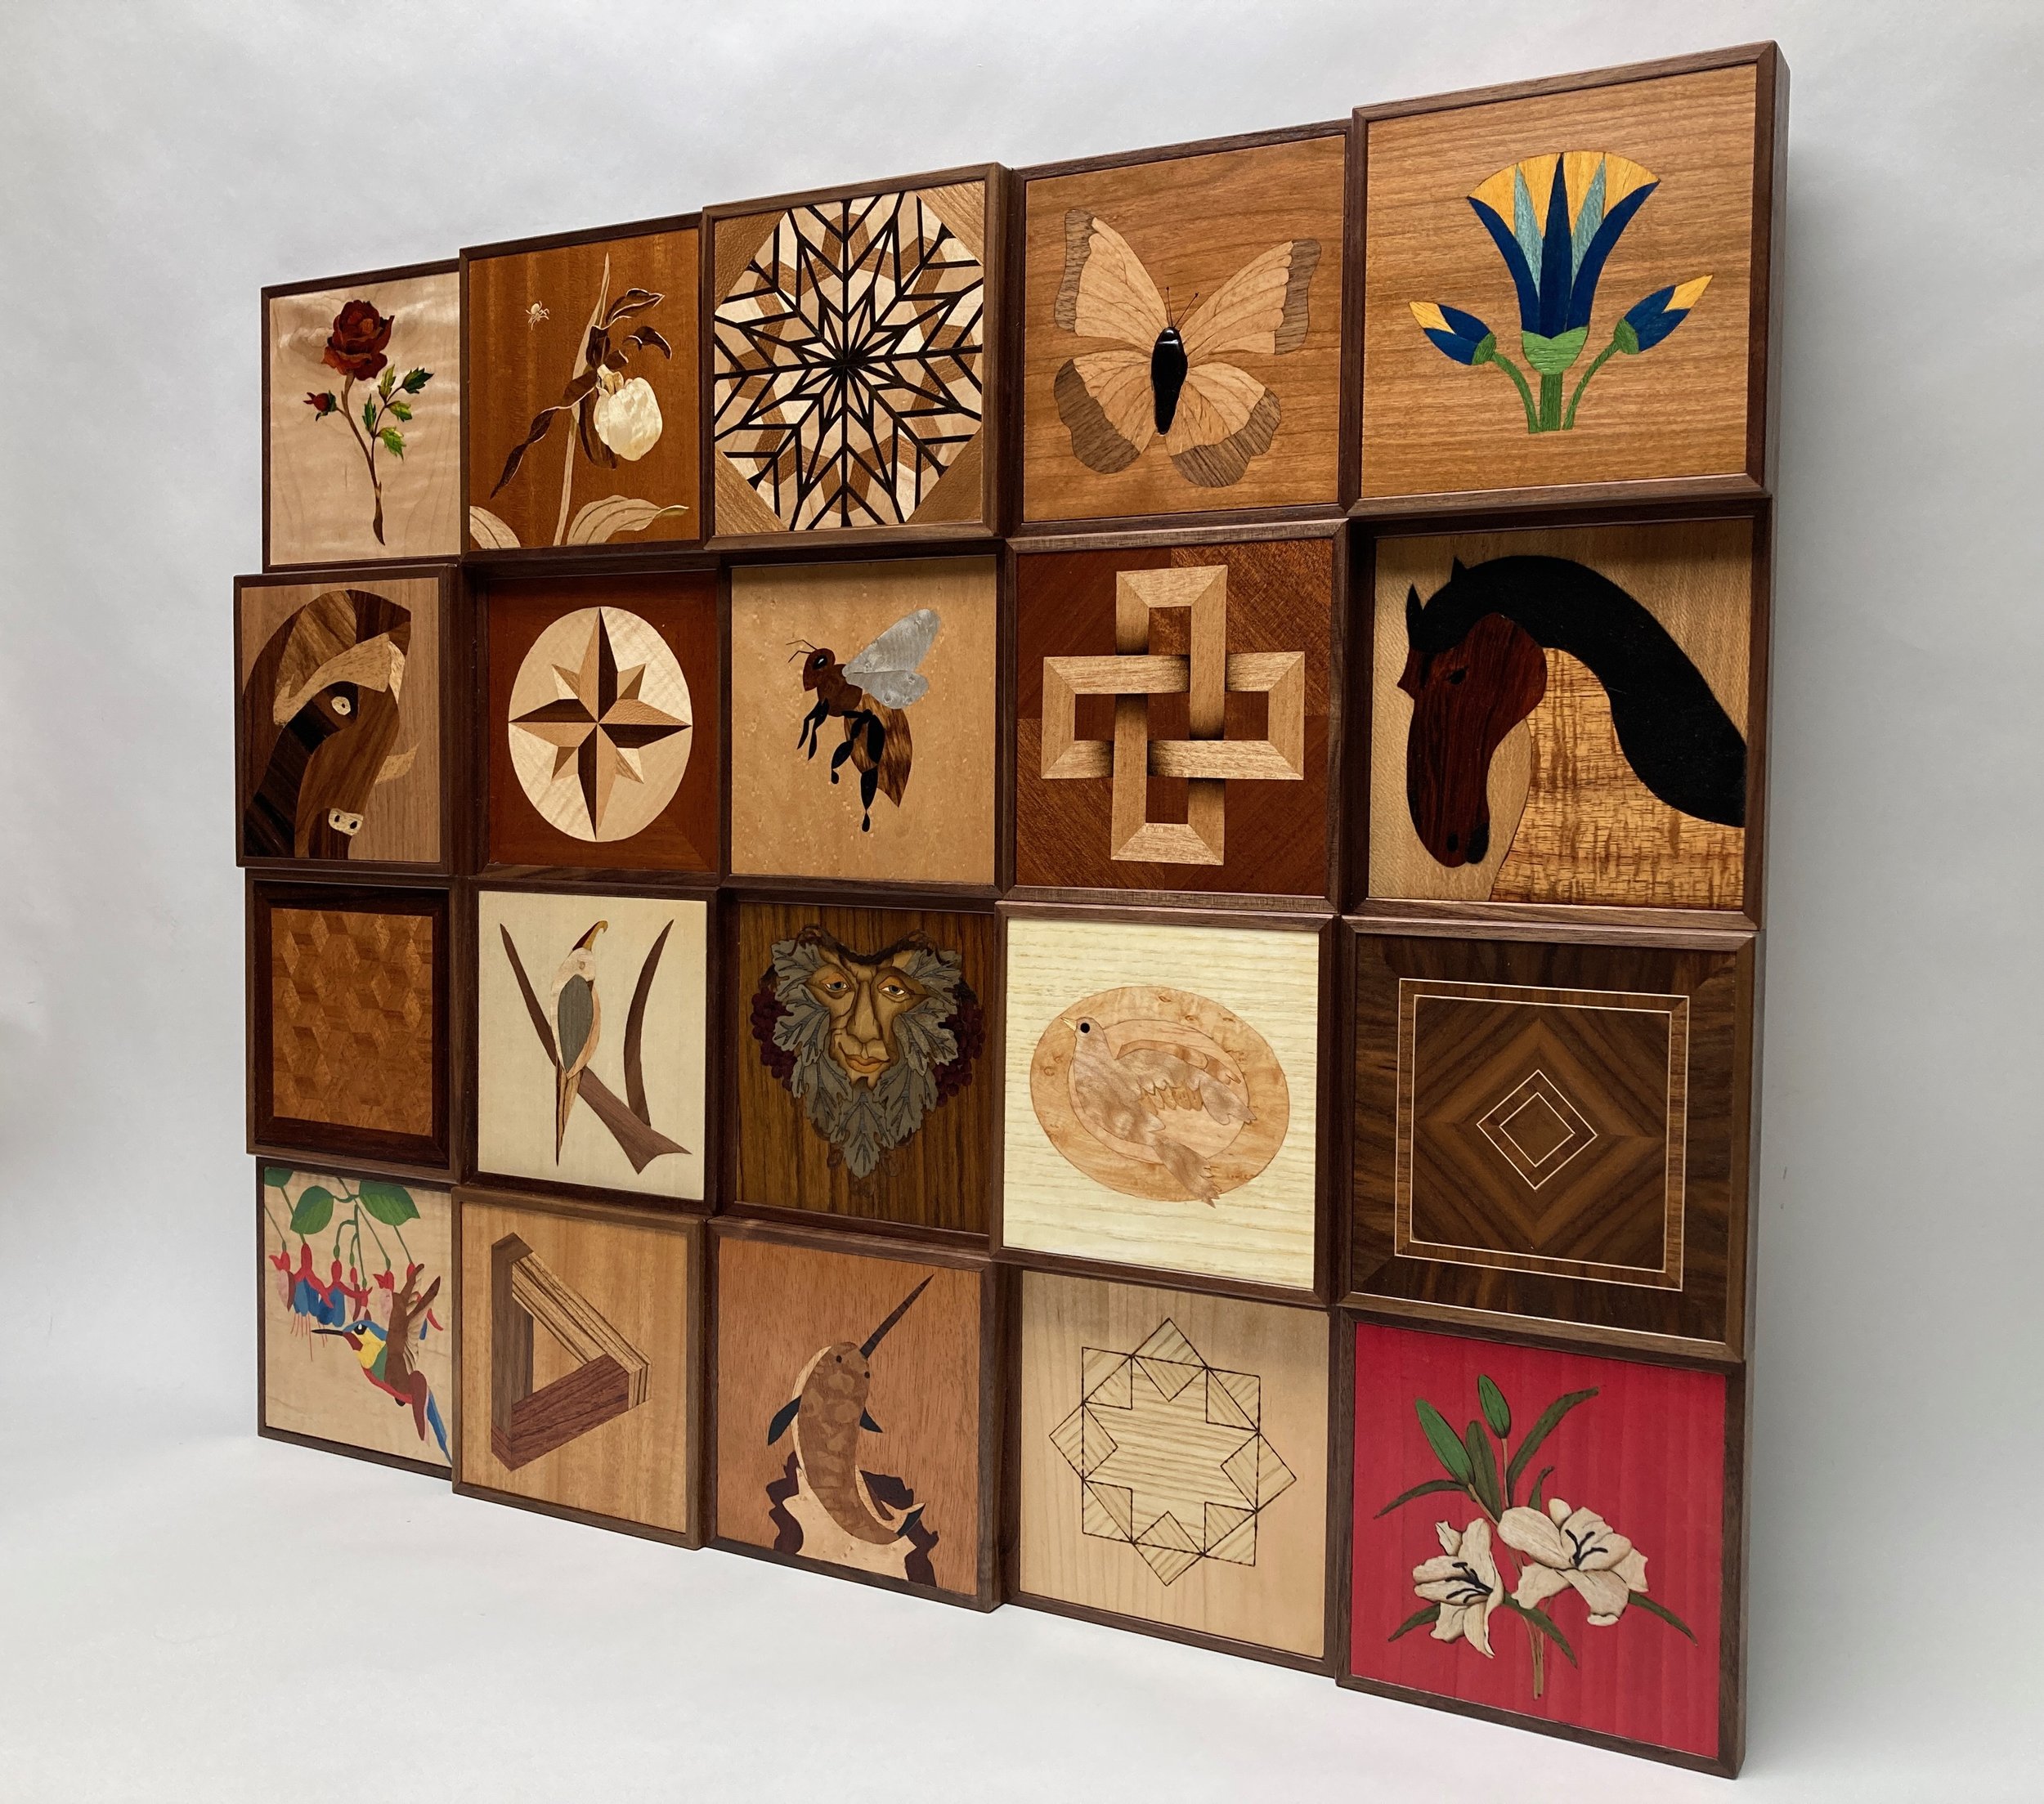
Angled view of finished Marquetry Medley.
How will the finished piece be attached to a wall?
The finished Marquetry Medley will look the best if it is attached flat on the wall and French cleats offer a way to do that. The hollow spaces behind the deeper frames are the perfect places to fit the French cleat batons to the Marquetry Medley. The other halves of the French cleats will be attached to the wall where the Medley will be displayed.

French cleat detail.

French cleats made of maple were machined to fit flush and glued into the back of two frames, that had deep recesses behind. The bottom pieces (next to the blue tape) are loose for now; they will be attached to the wall.
Finally, a finished piece; now who do I contact to get it donated?
Background Info for this story
My former dentist, who is in the group of nicest people you could ever know, had to leave his practice 5-6 years ago due to cancer. I have not seen him since then. His son is a pharmacist at our local drugstore/post office, so Wendy and I often see the son there, but we were both afraid to ask how his father is doing. Well, a few days after I picked up the finished “Marquetry Medley” from the Prefontaines, who should I meet on the sidewalk, looking as healthy as ever; it was Dr. Kovacik! He has first-hand experience at the Tom Baker Cancer Centre, has toured the new Cancer Treatment building and knows some people there. He agreed to promote it with his contacts.
We also have help from Rob Mulloy, who recently joined SAWS. He too has contacts at the Cancer Centre and is helping us with introductions.
I am anticipating another coincidence. When the time is right, the “Marquetry Medley” will find itself in the place it was meant to be.
Another Big Thank You to all who contributed and helped along the way.
Tam Godfrey